{MOH-lay}
From the Nahuatl molli, meaning "concoction," mole is a rich, dark, reddish-brown sauce usually served with poultry. There are many variations of this spicy Mexican speciality, usually depending on what's in the cook's kitchen. Generally, mole is a smooth, cooked blend of onions, garlic, several varieties of chiles, ground seeds (such as sesame seeds or pumpkin seeds) and a small amount of Mexican Chocolate, its best-known ingredient. (Some Americanized mole recipes use bitter chocolate.) The chocolate contributes richness to the sauce without adding overt sweetness.
-From The New Food Lover's Companion, Barron's Cooking Guide
So what did I make tonight for dinner? "Enchiladas" with "mole" sauce.
I don't really know what an Enchiladas is made of and my mole sauce certainly isn't authentic, but it was all really tasty.
Chicken Enchiladas with Mole Sauce
Serves 2, plus extra
For Filling:
1 lb chicken breast, boneless, skinless
small swirl of olive oil
1 tsp cumin
few shakes of Mrs. Dash
1/2 onion, sliced
juice of 1/2 a lime
Season chicken with salt, Mrs. Dash, cumin. Saute over medium heat for 8-10 minutes, turn, repeat. During the last few minutes, drop in the onions and lime juice, cover and remove from heat.
For Mole:
small swirl of olive oil
1/2 onion, finely chopped
1 clove garlic, chopped/minced
Salt to taste
1 tsp cumin
1 tsp oregano
1 TB chili powder
1/2 square, Bakers chocolate
1 8 oz can tomato sauce
Saute the onion and garlic is a little olive oil in a medium sauce pan until just tender, 4 minutes.
Add salt, cumin, oregano, chili powder, stir to incorporate, 1 minute.
Add tomato and simmer for 5 minutes, add the chocolate, stir until melted, about 5 minutes more.
To Assemble:
Take a tortilla, medium sized, fill! I put in about a tablespon of shredded cheese, some of the onions from the chicken, sliced chicken. I make six for the two of us and it's two too many, but those are extras for leftovers!
Roll and place in a baking pan with seam side down.
I bake in a 350 oven for 8 minutes, remove from oven, spoon over mole sauce, spinkle with a little more cheese and bake for another 5 minutes.
Serve and garnish with sour cream, salsa, gaucomole, whatever?!!?!?!
There are million ways to fill an enchilada, do what you like. What do you like?
Wednesday, November 30, 2005
Cookies
For the past two or three days I've been thinking alot about cookies. I love cookies. They make me happy. I don't bake cookies very often, no particular reason, I just don't. I've tried making some interesting cookies and they are usually very tasty. I did a White Chocolate and Dried Cherry cookie...I called it my Cherry Blossom Festival cookie. I ate the whole batch. Oops!
I think last holiday season I tried making these swirly chocolate and peppermint cookies. They were alright.
But when I'm really craving a cookie there are really only two kinds of cookies that satisfy, for me.
A really good Black & White Cookie. Which I haven't had in ages. I saw some on Unwrapped the other night, but I don't think I'll be heading north of NYC anytime soon to get them at Breadzilla. The other cookie, and a more realistic cookie target, Berger Cookies!
I was introduced to Berger Cookies just a few short years ago. They basically made me want to cry. Super rich! A vanilla cookie base, that is tender, moist and a little chewy with an unbelieveable fudgy frosting. Yum!
Based on their website, Berger Cookies are from Baltimore and are really just an East Coast treat. But you can order them online!!!
Now the big question, do I order and pay shipping, and wait a few days...or drive to Baltimore!?!?
Tuesday, November 29, 2005
Last Night
Last night I went to bed watching Secret Life of dot dot dot Fried Chicken on the Food Network.
BTW, you do need to say "dot dot dot," not just . . .
Jim O'Connor is the host and should really just shut up and go sit in the corner. Sometimes he's fun, but seriously, I don't need to watch a 35-45 year old man running around like a decapitated chicken in the road. Take a pill boy.
All of that said, I finally fell asleep and was sooooo dang hungry when I woke up this morning, having dreamed of Fried Chicken all night.
I have a feeling that in the next five days or so, I will be making my own Fried Chicken. I am in the line of people who like my Fried Chicken served warm with warm sides. I usually go with Mashed Potatoes and Corn. I've never been fond of the potato salad/cold Fried Chicken picnic route. Must be my aversion to mayonnaise. Blech!
So anywho, here is my recipe for Fried Chicken, can't remember where I got the recipe, but it will give you some super crispy Fried Chicken.
Buttermilk Fried Chicken
Bear with me as I try to remember it all, I lost the text version on my 'puter.
Please note that this recipe has an 8-24 hour marinating time.
1-2 lbs Chicken parts (for this recipe, I actually prefer all legs)
1 quart Buttermilk
1 tsp Cayenne pepper
Clean the chicken of excess fat. Leave the skin on. Place in a bowl or large zip top bag. Cover with Buttermilk seasoned with Cayenne pepper. Let sit in the refrigerator for 8 hours to 24 hours. The Buttermilk adds a great flavor and helps keep the chicken super moist.
3 cups of all purpose flour
2 tsp Cayenne pepper
A pinch or two of salt and a few grinds of pepper.
Combine the above ingredients in a medium/large bowl.
Heat 2 cups of vegetable oil in a heavy bottom skillet, cast iron is best, until it reaches 350 degrees. I do use a thermometer, but if you don't have one, test by dropping some flour in the oil, it will sizzle.
Remove the chicken from the Buttermilk and put in the bowl of flour, toss to coat. I like to give the chicken parts a bit of a squeeze to help give a thicker coat of flour on the chicken, for an extra crispy coating later.
Carefully place the chicken in the hot oil. Cook for ten minutes, then turn until golden, brown and delicious, about ten minutes more. You want an intenal temperture of 165. Remove to a rack to drain. Sprinkle with salt.
If the chicken is a little under done, place in a medium warm oven for a few minutes, about 350.
Now, on the important information regarding Fried Chicken...What about all that Fat!?!?!
Based on what our resident food geek says:
Immersion-frying is like a siege. The hot oil surrounds the food and looks for ways in. The water at the surface of the food defends its home by turning to vapor and pushing out in all directions (why most food seems to boil furiously at the beginning of the process), which is a good reason not to over-fill the vessel.That said, if you cook to the point that all the steam exits the food, the oil then has the opportunity to enter the food, ergo, greasy fried chicken, blech.
As the water vapor exits the food, it is replaced by moisture moving up from the food's interior. The same thing happens to the moisture in a baking potato, which explains why the center of a properly cooked french fry tastes pretty much like a baked potato.
As long as the oil provides enough heat (325-350 is ideal) and the moisture inside the food is sufficient to produce plenty of steam, the outside of the food gets crispy while the inside cooks without becoming greasy (it does in fact steam).
Monday, November 28, 2005
More Thanksgiving Food Photos
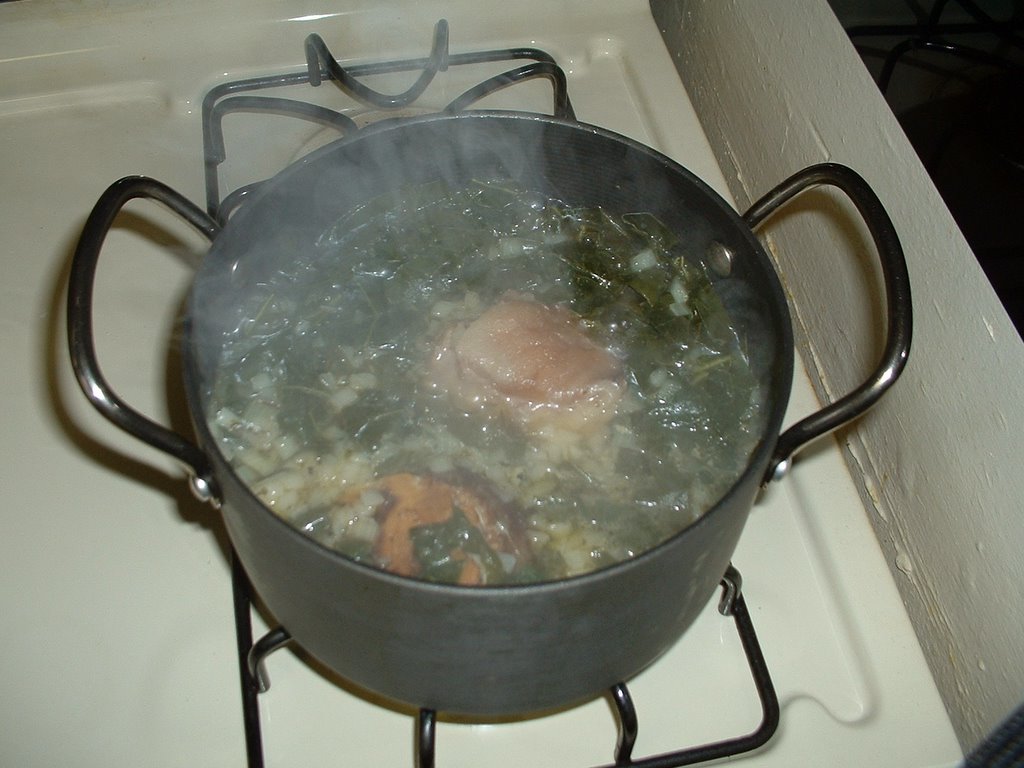 The Greens are cooking on the stove top!
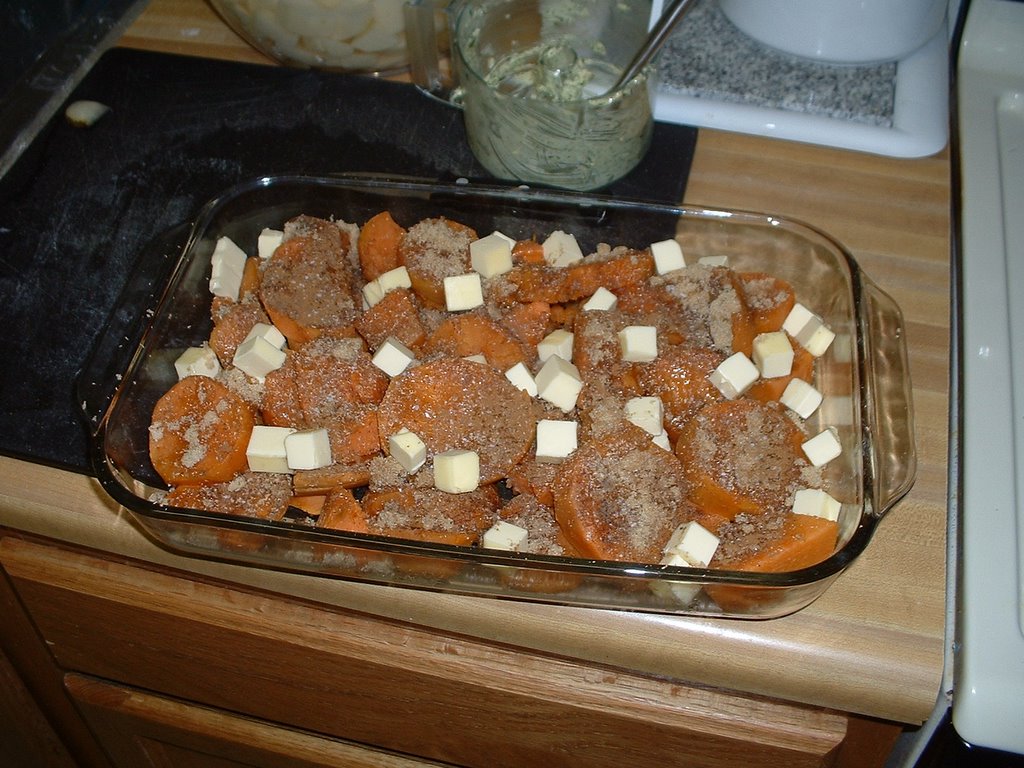 Sweet Potatoes before they go in the oven.
 The Chiffon Pumpkin Pie
 Making Drunken Cranberries
 Tbe Spread
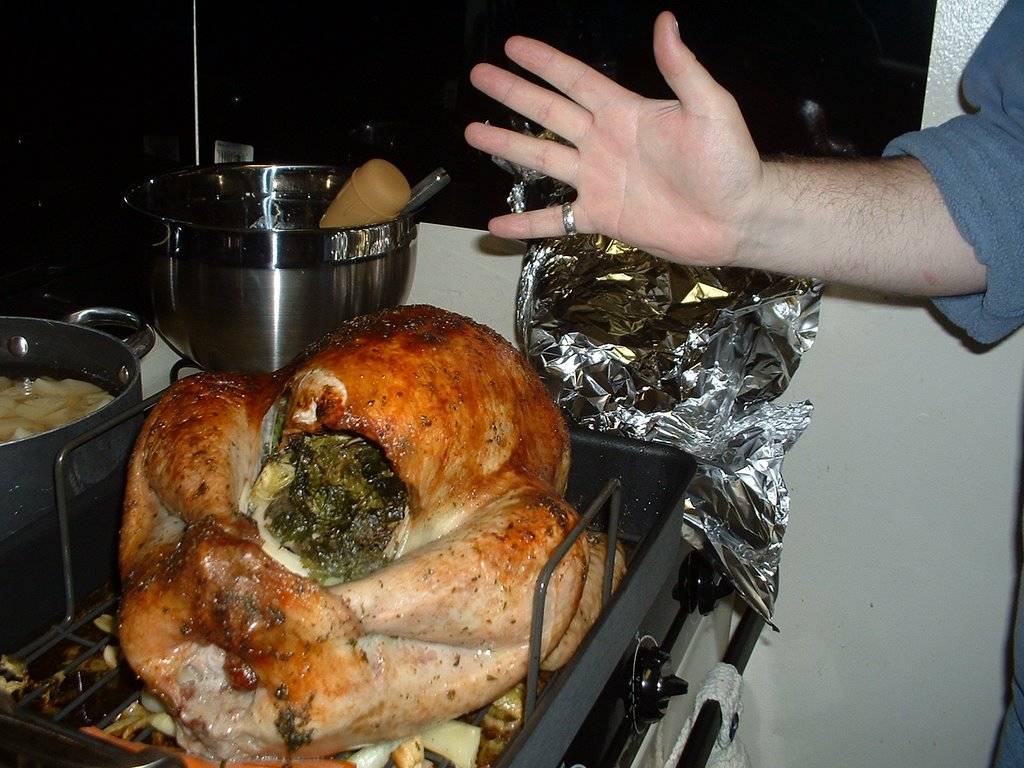
The Turkey
I kept things simple this year. We got a Butterball. So I didn't brine the bird as, it turns out, I did do last year.
When I made my Turkey this year, I stuffed it, but not with stuffing (dressing). I stuffed her with onions, apples, celery, lemon, herbs (parsley, sage, rosemary & thyme--try saying that without singing it.??!). I also massaged the bird with a compound butter with the same herbs, as well as salt and pepper.
I started the oven at 500 degrees and when I put the bird in, I lowered it to 350. Every 30 minutes, I took the bird out to baste with broth and butter...depending on my mood. When she achieved the appropriate color, I covered her with foil, so she wouldn't burn or dry out to much.
At about 3 1/2 hours, she was done. She came out of the oven and rested for 30 minutes before we cut her up and ate her!!!!!
 Two and a half hour mark!
 Ding Dong, She's Done!
Dessert with Dinner
I promised a few more recipes from Thanksgiving. The remaining ones don't really fit as recipes, as they do guidelines.
Here are the Sweet Potatoes:
5-7 medium to large sweet potatoes, peeled and sliced about 3/4 of an inch
1 stick of butter, cut to small cubes
1/4 cup of brown sugar
Cinnamon
Allspice
Nutmeg, freshly grated (I used one full nutmeg nut)
pinch or two of salt
Mini-Marshmallows
Prepare the sweet potatoes as described above, the place in a large kettle, cover with water and simmer until tender. Prick with a knife and you'll know that they are done.
Drain, cool.
Prepare a 13x9x2 baking pan by coating with butter. Place the sweet potatoes in the baking pan. Spread the brown sugar evenly over the top. Drop the pieces of butter around the top of the potatoes. Sprinkle with cinnamon, allspice and fresh grated nutmeg, then add the salt...just a bit...to help with the sweetness. Cover with the marshmallows.
Place in oven at 350 for about 30 minutes...I put in the oven when the Turkey comes out and the potatoes are done when all is warmed through, the butter is melted and the marshallows are turning light brown.
This was the #1 hit this Thanksgiving. Enjoy.
Friday, November 25, 2005
Post-Bliss
Thanksgiving was great, if I do say so myself. The turkey was tasty and perfect. We documented the full dinner, so we'll be seeing photos later. The overwhelming hit of the night were my sweet potatoes.
I'll get the recipe for that and what I did to the turkey in a few days. I'm tired and stuffed. We're leaving in a few short hours for the great bustling metropolis in the north, Edgewater, NJ
Much love to all and come back in few days (Sunday?).
sse
I'll get the recipe for that and what I did to the turkey in a few days. I'm tired and stuffed. We're leaving in a few short hours for the great bustling metropolis in the north, Edgewater, NJ
Much love to all and come back in few days (Sunday?).
sse
Wednesday, November 23, 2005
Stuffing
Today I'll being in the prep for my stuffing for Thanksgiving Dinner.
I don't have a recipe, so here's my first attempt to get it in writing.
Scott's Stuffing/Dressing:
1/2 a loaf of white sandwich bread-cubed, about 1/2 inch
1/2 a loaf of wheat sandwich bread-ditto
1 onion, medium diced
Butter, couple tablespoons
Sage, fresh, finely chopped
Stock or Broth, a few cups
"Poultry Seasoning"
I take the bread and slice it into 1/2 inch cubes and dump them all in a paper bag. I fold the bag over and let this sit overnight. I will shake the bag up every few hours. You want to bread to 'dry' out. I don't want it to dry to a complete crisp, but pretty close, but no worries if it does.
When I'm ready to make the dressing, I will saute the onions in the butter, until they just start to carmelize. I'll add the fresh herbs.
Add the butter, sage, onion mixture into a mixing bowl and add the bread. Start adding the stock, about a cup at a time. Mix, with your hands. I toss and squish. I take handfuls and just squish it through my fingers, lightly, sort of. I don't want a complete mush, but a cross texture. Season with poultry season, salt and pepper to taste.
This year, I'm not stuffing the turkey, but making this as a dressing, so I'll place in a buttered baking dish and put in the oven during the last 1/2 hour of turkey cooking. I give it about and hour.
I really like to stuff the turkey, but I've never gotten enough stuffing for all the people who are coming over and I end up making a side dish of dressing anyway. This year, I'm stuffing the turkey with other stuff, herbs, onions, apples, lemons.
This is my take on the dressing/stuffing. I'll add an addendum as I move forward today and tomorrow to clarify what I have here.
Tuesday, November 22, 2005
Tips for the Perfect Mashed Potatotes
From The Joy of Cooking:
From Scott:
Add and incorporate your butter/fat first, then do the milk or cream. Use butter, cream, salt, pepper and/or whatever you want, to taste!
A food mill or ricer ensures a smooth puree. You can use an electric mixer as well. A potato masher or a fork takes more elbow grease but can do the job. The food processor is too hard on potatoes, leaving them with an unappetizing gluey texture. Baking potatoes make the best mashed potatoes. Mashed potatoes are best when served at once, for they lose their fluffiness when held or reheated.
From Scott:
Add and incorporate your butter/fat first, then do the milk or cream. Use butter, cream, salt, pepper and/or whatever you want, to taste!
Monday, November 21, 2005
Another Thanksgiving Dessert
With the Pumpkin Bars, a store bought traditional Pumpkin Pie, this is the final Pumpkin Dessert for this year's Thanksgiving Dinner.
I saw the recipe on Simply Recipe-a food blog that inspired me to try to my hand it. Visit the site when you have a chance, some great stuff over there.
I did a dry run of this pie almost two months ago. It was super easy and really tasty. I am going to offer some of my suggestions at the end.
Chiffon Pumpkin Pie
Crust Ingredients:
2 cups crushed gingersnaps (few pulses in a food processor)
1/3 cup sugar
1/4 tsp ground ginger
6 TB melted butter
Filling Ingredients:
1 envelope gelatin
1/2 cup brown sugar
1/2 tsp salt
1/2 tsp ground nutmeg
1/2 tsp ground ginger
1 tsp ground cinnamon
1/2 cup milk
3 eggs, seperated
1/2 cup rum
1/4 cup granulated sugar
1 3/4 cups pure pumpkin (or puree from 1/2 a medium sugar pumpkin)
1 cup heavy cream, softly whipped, for topping
Extra crushed gingersnaps (for garnish)
Crust Instructions:
Set the oven at 325. Have on hand a 9 inch deep dish pie pan. Butter it lightly.
In a bowl, combine the crushed gingersnaps, sugar, ginger and butter. Press the mixture into the pie plate with the back of a spoon, making the top edge even all around. Bake the crust for 8-15 minutes, until it is lightly browned. (Baking time depends on the oven and on the type of pie dish you are using--a ceramic dish will take longer because it takes longer to heat up.)
Filling Directions:
In a heavy-saucepan, combine the gelatin, brown sugar, salt, nutmeg, ginger, cinnamon, milk and egg yolks. Stir thoroughly. Set the pan over medium heat and cook gently, stirring constantly, until the mixture thickens slightly. Do not let it boil.
Remove the mixture from the heat and let it cool. Add the pumpkin puree and the rum. Refrigerate the mixture, stirring occasionally, until it thickens enough to form mounds.
In an electric mixer, beat the egg whites and granulated sugar until they form stiff peaks. Stir a few spoonfuls of the egg whites into the pumpkin mixture, then fold in the remaining whites.
Pour the filling into the cooled crust. Refrigerate for several hours.
Just before serving, spoon the whipped cream onto the filling and garnish with crushed gingersnaps.
NOTES:
I plan to omit the extra ginger in the crust. The gingersnaps that I used were particularly strong, so the extra ginger became overpowering.
I think I plan to double the nutmeg, ginger, cinnamon in the pie filling. I feel that the amounts that are listed give the pie a barely spiced flavor.
I used the full amount of rum when I made this and it over powered the whole thing. I'm going to only do 2 TB when I make it again. I'm sure you can also omit completely if you like.
Sunday, November 20, 2005
Collard Greens
Another J-lo recipe for this year's Thankgiving
Collard Greens
1 package smoked turkey necks
1 bunch of collard greens (stems removed), cut into small bite sized pieces, washed and spun dry
salt
pepper
garlic powder
italian seasoning
onion powder
Goya seasoning
Seasoning salt
Accent (MSG)
1 medium onion, medium diced
Boil enough water to cover the turkey nexts, with all spices, about 45 minutes.
Add greens and cook down until tender (about 30 minutes.)
Add onions and cook until soft.
**Taste constantly to adjust seasoning!
J-LO: As a Yankee, I had not grown up eating greens, and tasted them for the first time during my inaugural Thanksgiving in DC. My friend Nadine made them, and despite the disturbing look to them, I sampled. They were divine. Since that time, I tried various recipes on my own to no avail. After picking up some basic dos and don’ts from Alton Brown, I begged Nadine for the recipe, which is what you see here. You’ll notice it has a slight Italian edge to the seasoning, which makes them more flavorful. Many recipes call for spicier ingredients (like hot sauce or red pepper flakes) or vinegar (apple cider or red wine). Personally I found those to be too overpowering, and I prefer to keep the dish mild. This allows each person to add additional flavor to his/her own taste.
Pumpkin Bars
This is another of J-lo's recipes we'll be having this year for Thanksgiving. Because of the sheer volume of desserts, we're doing just a half of the recipe.
Pumpkin Bars
about 12 bars
1 stick of butter + 2 TB
Yellow Cake mix
4 eggs
Large can of pure pumpkin
1 1/4 cup sugar
Small can of evaporated milk
Nutmeg
Ginger
Cinnamon
Melt 1 stick butter and mix with cake mix and 1 egg. Cover bottom of a 9 x 13 pan with most of this mixture, reserving enough to 'dot' the top later. In a large bowl, mix pumpkin, 3 eggs, milk, 3/4 cup sugar. Add spices to taste, twice as much cinnamon (approx: 1 tsp cinnamon, 1/2 tsp each ginger + nutmeg). Pour into the pan.
Melt remaining butter (2 TB) and mix with reserved cake batter, adding 1/2 cup of sugar. Crumble over the top of the pan.
Bake at 350 for 30-45 minutes, until toothpick comes out clean.
J-LO: I spent a summer working in an ice cream & dessert shop near Dupont Circle, and this was our signature recipe. It was passed to one of the owners by her grandmother. This is rich and deadly! The best way to serve it is warm with a scoop of ice cream – preferably a sweet spicy flavor like cinnamon or chai (although good vanilla works, too). And note that the baking time is an approximation. You really must test it with a toothpick in a couple places. If it’s underdone you’ll have what I call “smashed pumpkin”. But if it’s overdone you’ll have a cake-like texture that’s not as appealing. The finished product should be soft and moist and mostly firm.
Baked Corn Casserole
This recipe is from J-lo's family and will be part of our Thanksgiving Dinner this year.
Baked Corn Casserole
Serves 4-6
1 can cream corn
2 TB butter
1/3 cup chopped green pepper
1/4 cup chopped onion
1/2 tsp salt
1/2 tsp pepper
3/4 cup saltine crackers, crushed
2 eggs, beaten
Seasoning Salt
Mix all, but seasoning salt in a buttered baking dish. Sprinkle with seasoning salt. Bake at 350 for 30 minutes.
J-LO: This is a staple side dish on my Mom’s side of the family, which we had at every family gathering. It’s quick, easy, and hearty. This year we’re going to try adding some frozen whole kernel corn to give it more texture. Definitely an easy recipe to tinker with – you could try adding additional vegetables, add spices, substitute bread crumbs, etc.
Friday, November 18, 2005
Meet my new Beau
The 2005 Beaujolais Nouveau was released yesterday, 11/17/05. Certain circumstances prevented me from sampling some last night, but I did pick up a bottle today while out for lunch.
I picked up the George DeBeouf, for about $15 with tax included...and that was downtown DC. Hope you can find it cheaper. Will let you know what we think of it after we pop it open!
Anyone have any thoughts on this year's product?
An anonymous wine source whom I trust very much has this to say:
Thanks Anonymous Source, wink wink!
I picked up the George DeBeouf, for about $15 with tax included...and that was downtown DC. Hope you can find it cheaper. Will let you know what we think of it after we pop it open!
Anyone have any thoughts on this year's product?
An anonymous wine source whom I trust very much has this to say:
While most inexpensive releases can be considered swill, the 2005 Domaine Dupeuble is good and affordable. Most Whole Foods should be carrying it but
call first to confirm.
Thanks Anonymous Source, wink wink!
Legal side of Thanksgiving
Hello all,
Make sure to get copies of the Thanksgiving Waiver before your guests arrive for dinner, you want to make sure your legal sides are all covered!
Thanks Sterfanie!
Make sure to get copies of the Thanksgiving Waiver before your guests arrive for dinner, you want to make sure your legal sides are all covered!
Thanks Sterfanie!
Wednesday, November 16, 2005
Merry Mints
Say goodbye to your teeth, or make an appointment with your dentist prior to eating these melty, yummy, butter mints!
A gal pal of ours used to bring these into the office and I would eat a million, often crying with a sugar headache by the afternoon.
That said, they are yummy and a fun treat to have out at a party.
Merry Mints
makes around 4-5 dozen, depending on how you cut them
2 1/4 cups powdered sugar
1/4 cup butter, softened
1 TB milk
1/8 tsp peppermint extract
3 drops of food coloring, your choice of color
"Candy Coating" (That's really what it's called and can be found either in the baking section of your store, or, where I found it in my Safeway, near the ethnic foods/Jewish section)
Line a cookie sheet with waxed paper. In a small bowl, combine all ingredients. Blend well. Knead dough until smooth. On waxed paper, roll to 1/4 inch thickness. Cut shapes with cookie cutters, or knife. Place on waxed paper-lined cookie sheest. Cover and refrigerate until firm.
Melt candy coating according to instructions. Dip half of each mint into the coating, allow the excess to drip off, return to the waxed paper, until set. Store in a covered container.
About the candy coating: Before melting, chop it into 1/2 inch chunks and then melt quicker. If it is too hot when dipping, it will run off and form pools around the mints. If it's too cool, it will be clumpy, just re-warm in the microwave.
Enjoy!
Hungarian Goulash
Several years back I used to recieve recipes in my email in box on a daily basis. Don't know what ever happened to those. Many of them were crazy and not something I would try. This one however, was one I wanted to try and now really enjoy.
Goulash, known as gulyas in its native Hungary, is a stew of beef with vegetables and flavored with Hungarian Paprika. It's sometimes dolloped with sour cream and/or served with buttered noodles.
The recipe is as I received it, with my comments in italic.
Add the round steak to the kettle and brown evenly. Stir in salt, paprika, pepper and marjoram.
Add white wine to deglaze, then add the beef broth. Add the onion/bacon mixture. (Again, hold the bacon.)
Bring to a boil, reduce the heat, and simmer covered for 1 hour, or until the meat is tender. (I did simmer for an hour, but the beef wasn't getting tender enough, so I raised the heat to high and brought it back to a boil, with the cover on, I then transferred it to a hot oven, about 400, for an extra 1/2 to full hour. Add the bacon about ten minutes before you serve.)
Also, I added about 1 TB of tomato paste, just for some extra yumminess!
Voila! Another curl up with a warm bowl of goodness meal! And remember the spice quantities are guidelines, if you want your goulash more mild, then use less paprika, if you want it fiery, use more.
Updated 10/3/07: Pictures and notes added here.
Goulash, known as gulyas in its native Hungary, is a stew of beef with vegetables and flavored with Hungarian Paprika. It's sometimes dolloped with sour cream and/or served with buttered noodles.
The recipe is as I received it, with my comments in italic.
Hungarian Goulash
Serves 4
Est. cooking time: 1 hr, 20 mins
6 strips bacon, chopped
3 onions, peeled and chopped
1 ½ pounds round steak, cut into 1-inch pieces
2 teaspoons salt
½ teaspoon paprika (I do about two tablespoons, one of Hungarian Paprika and one of a hotter variety picked up in the Latin food section of my grocery store)
½ teaspoon ground black pepper
1/8 teaspoon marjoram (I do about 1 full teaspoon, maybe more)
2 cups beef broth
1 cup white win
Add the round steak to the kettle and brown evenly. Stir in salt, paprika, pepper and marjoram.
Add white wine to deglaze, then add the beef broth. Add the onion/bacon mixture. (Again, hold the bacon.)
Bring to a boil, reduce the heat, and simmer covered for 1 hour, or until the meat is tender. (I did simmer for an hour, but the beef wasn't getting tender enough, so I raised the heat to high and brought it back to a boil, with the cover on, I then transferred it to a hot oven, about 400, for an extra 1/2 to full hour. Add the bacon about ten minutes before you serve.)
Also, I added about 1 TB of tomato paste, just for some extra yumminess!
Voila! Another curl up with a warm bowl of goodness meal! And remember the spice quantities are guidelines, if you want your goulash more mild, then use less paprika, if you want it fiery, use more.
Updated 10/3/07: Pictures and notes added here.
Thanksgiving Reading
A couple stories from today's New York Times:
The Pilgrims Didn't Brine
I will be doing a basic kosher turkey with some basic seasoning, yum yum.
Serving Essence of Pumpkin
This year will see three pumpkin desserts. A classic, traditional pie, a pumpkin chiffon pie and pumpkin bars!
What to Make First?
Thanksgiving really is a three/four day process. I would say 75% of the cooking will be done in advance and just re-heated as the turkey rests.
Wahoo! Just over a week to go kids.
Tuesday, November 15, 2005
Polly Want A...
Homemade Cracker???
I've made these several times and I love them and they usually are enjoyed by our guests. They are pretty simple and generally use ingredients you probably already have on hand. And a good way to use up some extra rosemary.
Cheddar Rosemary Crackers
Yields about 3-4 dozen crackers
1 1/3 cups all purpose flour
1 ¼ cup Shredded Cheddar Cheese
¼ cup Parmigiano Reggiano
1 Teaspoon Salt
1/8 to ¼ teaspoon cayenne
½ cup butter, cut into pieces
1 large egg yolk
2 Tablespoons cold water
3 Tablespoons finely chopped Rosemary
Schlup the flour, cheeses, salt, cayenne together in a large bowl or mixer. Add the butter in pieces and combine until it resembles coarse crumbs. Stir the yolk and water together. Drizzle over the dough and quickly mix/pulse in the mixer until the dough forms small most crumbs. Add the rosemary and pulse again.
Pile the moist crumbs on an unfloured work surface. With the heel of your hand, push and gently smear the crumbs away from you until they start to come together. Repeat about three more times, rotating the pile 45 degrees each time. Roll into one or two long rolls about an inch or inch and a half in diameter. Wrap in plastic wrap and refrigerate until solid. The dough can also be frozen for up to a month and then thawed for about an hour before baking.
Slice off pieces no more than 1/4 inch. Arrange on a baking sheet 1/2 inch apart.
Bake at 375 for 15-20 minutes until golden and delicious. Sprinkle with kosher salt as they come out of the oven, cool, enjoy.
When cooled completely, store in an airtight container. If they start to stale, refresh in a 325 oven for a few minutes.
Double Cheese Penne
This will make you drool! I love this dish. I have a made it several times. I got it from my favorite food magazine: Fine Cooking!
Double Cheese Penne
Fine Cooking, March 2003
3 TB Olive Oil
3/4 lb Penne pasta
1 lb sweet Italian sausage
2 Garlic cloves, minced
1 can (28 oz) whole peeled tomatoes
2 or 3 pickled Italian hot cherry peppers (from jar), cored, seeded and diced
2/3 Cup freshly grated Parmigiano Reggiano
Salt/Pepper
8 oz Shredded mozzarella (about two cups)
In a large covered pot, bring salted water to a boil. Lightly grease an 8x11 baking dish with 1 TB olive oil.
Add the penne to the boiling water and cook until it's al dente. Drain the pasta well and return it to its cooking pot.
Meanwhile, heat the remaining 2 TB olive oil in a large skillet over medium-high heat. When the oil is hot, add the sausage, let it sit for a minute and then start stirring and breaking it into bite size pieces with the side of a slotted spoon. Cook until lightly browned, another 2 or 3 minutes. Transfer to a plate.
Add the garlic to the pan, season with salt and cook, stirring constantly, until it colors slightly, about 30 seconds. Add the tomatoes and their juices and cook at a rapid simmer, stirring occasionally and breaking up the tomatoes with the spoon, for 5 minutes so the sauce thickens slightly.
Meanwhile, position an oven rack about 6 inches from the broiler, turn on high. Stir the sausage and it's juices, the diced peppers and 1/3 cup of the Parigiano into the sauce. Cook, stirring, until the sausage is cooked through, 3 to 5 minutes. Taste for salt and pepper. Pour the sauce over the cooked pasta in the pot and stir well. Spread the pasta and sauce evenly in the baking dish. Sprinkle with the mozzarella and the remaining Parmigiano. Put the baking dish on a baking sheet and broil until the cheese melts and browns in places, 2 to 4 minutes. Serve immediately with more Parm, if you like.
NOTES:
Skip the sausage if you like, making it a veg friendly dish!
I like using Roasted Red Bell Peppers instead of the pickled Hot Red Peppers, but if you want, omit it all together.
Don't leave your stove/kitchen when you have the dish under the broiler, it can go from great to burnt in a minute. Becareful.
Monday, November 14, 2005
Spice Blends
Hi all,
I've been cleaning out several folders and binders of recipes and stuff I've been hoarding for several years. Hence the multitude of postings lately.
Tonight I found two scrap sheets of paper with spice blends on them. They don't have quantities, so you'd have to play it by ear and try them out. In terms of storage for these spice blends, I always save my spice jars and reuse them for all sorts of goodies. Just wash with a mild detergent and dry completely. Sometimes I'll soak with a mixture of water and lots of baking soda. I've not experienced any cross "contamination" from my nutmeg to cayenne pepper for vice versa.
Italian Seasoning:
Marjoram
Thyme
Rosemary
Savory
Sage
Oregano
Basil
I would use less thyme, rosemary and sage and a little more of the others.
Emeril's Essence:
Paprika
Salt
Black Pepper
Cayenne Pepper
Garlic Powder
Onion Powder
Thyme
Oregano
Here I know from my notes that paprika is the base, I guess go out from there in terms of quantities.
Use these spice blends as you see fit. I think the last time I mixed up some Essence, I used lots of it on popcorn!
In terms of spices, the rule of thumb with most spices is from the time you open them you have about 6 months before they lose their potency. Although a noble timeline, I laugh in the face of Alton Brown....I would be wasting so many spices (and MONEY) if I did that. Some of my spices that I buy in larger quantities are in double ziplocs to keep them fresher a little longer. That said, if the spices do start to go stale, it might be time to replace. If your can of allspice looks like it came from your grandmother's spice cabinet aka 1981, you may want to replace it! Serious:::I know that's exactly what's in my mother's cabinet!
Another Scott Original
I don't know what prompted me to create this recipe, but I think it had to do with what I had and what I was craving....I don't know of too many flavors that match as well as cilantro and lime. And I must say, I used to really dislike cilantro, but it started to really grow on me and now I'm loving it in certain dishes.
Cilantro and Lime Chicken Tacos
Serves 4, if your tiny, 2 if you're really hungry! So much for leftovers for lunch tomorrow.
1 lb Boneless/skinless chicken breasts
1 or 2 shallots, medium dice
1 or 2 limes, zested and juiced
1 handful cilantro, chopped
Salt and Pepper to taste
Olive Oil
Seasoning like Mrs. Dash (optional)
Prepare chicken with a light coating of olive oil, salt, pepper and seasoning. All to taste. In a medium saute pan, over medium-high heat, cook the chicken, about 5 minutes on each side. Leave the chicken alone, so it can develop a nice sear, so don't turn it to much.
While the chicken is cooking, dice your shallots and zest/juice your lime.
When the chicken is cooked through, remove to a plate to rest for about five minutes. Remove pan from heat, don't clean it, we'll be going back to it as is in a few minutes. When the chicken is cool enough to handle, roughly chop with a chef's knife to about 1/4 to 1/2 pieces.
Return your pan to medium-high heat, add a teaspoon of olive oil, when hot, add your diced shallots and saute until just softened/browned. Add your juice and zest, deglaze your pan, simmer for a brief minute, it will reduce slightly. Add your chopped chicken and stir to incorporate. Add the cilantro stir again.
Serve with your typical taco fillers.
Without sour cream or guacomole, it's a pretty healthy dish. Enjoy!
Sunday, November 13, 2005
My take on Baklava
I haven't made this for a few years, but when I first made it, I ended up making it four times in about two months. Super tasty.
Bakalava (Scott's Version)
1 cup sugar
1/2 cup water
1 TB lemon juice
1/4 cup honey
5 whole cloves
1 cinnamon stick
1 tsp orange extract
Combine these ingredients in a small saucepan, cook over medium heat until sugar dissolves; continue simmering until mixture thickens and coats the back of spoon. Cool and refrigerate until needed later!
1 tsp ground cinnamon
1 tsp ground cloves
2 cups pistachios, ground
1 cup almonds, ground
3 TB sugar
1 package (16 oz) phyllo dough (supermarket freezer section)
1 cup unsalted butter, melted
Preheat the oven to 350.
Combined first four ingredients in a small bowl. Set aside.
Allow the phyllo dough to come to room temperature, in it's packaging.
Liberally butter the bottom and sides of a 13x9x2 inch baking pan. Place half of the phyllo dough sheets in the pan, one at a time and brushing each sheet, gently with melted butter.
While working, keep the phyllo dough covered with a damp cloth. The phyllo is very tender and fragile. It can dry out very quickly.
Sprinkle a third of your pistachio mixture over the bottom layers of the phyllo dough. Cover with five more sheets of phyllo, again one at a time, with butter between each sheet. Repeat two
more times. Brush the top layer with more butter. Refrigerate for 1 hour.
So, you'll have a thicker layer of dough on the bottom, nuts, dough, nuts, dough, nuts and dough. I can't remember how many sheets of dough are in each package, if you need to cut back the number of sheets on the bottom, that ok, but try to have at least five/ten sheets.
After the unbaked bakalava has cooled for one hour, cut through the top layers of phyllo diagonally to make 24 equal diamond shaped pieces.
Bake for 30 minutes, then increase heat to 400 and bake an additional 15 minutes or until golden brown.
Remove from the oven and pour over the reserved syrup mixture. Let cool. Slice all the way through the previous cuts to make 24 bars.
UPDATE (3/9/06): Head to The Traveler's Lunchbox, to read more about baklava.
A highly requested favorite
I can't believe I'm giving away one of my trade secrets. I first made this recipe about 4 years ago, I found the recipe somewhere and I can't remember where...it was a magazine, that's all I can remember...Gourmet...Bon Appetite?
This dish is pretty simple, but can be very classy and served in a pretty cool way!
Ladies and Germs, I give you:
Pumpkin Risotto
serves about 4
1 1/4 cup peeled, seeded, diced pumpkin (Sugar Pumpkins, the small ones, better tasting, less stringy)
4 cups of stock, plus 2 cups of water (chicken or veg, your choice, also, you may not need all of it)
1 small to medium onion, finely diced
1 TB olive oil
1 cup of Arborio Rice (most grocery stores carry Arborio Rice, it is the traditional, perfect rice for Risotto, I wouldn't recommend another type of rice)
1/2 cup grated fresh Parmigiano-Reggiano cheese
1 TB butter
Salt & Pepper to taste
Cook diced pumpkin in simmering water until tender, about 3-4 minutes. Reserve.
Bring stock/water mixture to a simmer and keep it there. When making risotto, you add the stock a little at a time and if it is cold, it will take twice as long and may affect the texture.
In large sauce pan, heat oil over medium heat and add the onion, sweat the onions until translucent, do not saute, you don't want to brown the onions, just sweeten and tender them.
Add your rice and stir to coat with the oil, keep stirring for 2-4 minutes until the edges of the rice are translucent.
Add enough stock until the rice is just covered, allow to simmer, stir occasionally, until stock is absorbed. Add another cup of stock, stir/simmer/etc until absorbed. Repeat until the rice is al dente.
Remove from the heat and add parmigiano, pumpkin and butter. Stir and serve immediately.
This will take about 20-25 minutes. It requires your attention. Don't leave it unattended.
NOTES:
Risotto doesn't hold well. Reheating won't give you the same tasty treat. There are other things you might want to try, IF you have left over. Shape into patties and fry in a pan...rice cakes?!?!
When I simmer the pumpkin to make it tender, I actually simmer it in the stock...a little cross flavoring.
The first two or three times I served this, I actually served the risotto in mini pumpkins that had been roasted! It was beautiful. You'll need four mini pumpkins, carved and cleaned out. Roast for 10-20 minutes at 350-400 degrees. Until just tender. It's pretty, but not necessary.
I haven't, but I think the addition of some fresh chopped sage would be a really tasty addition.
Enjoy!
UPDATE:
DC FOOD BLOG posted a great recipe for using up left over risotto. Check it out!
UPDATE: (10/12/06)
Photos post here.
DC "Cheap Eats"
CNN.com posted a story from Southern Living about cheap, tasty places to eat in DC. Certainly geared towards the tourist crowd, I hadn't heard of two or three of the places that are actually near my office. Might have to consider checking them out sometime.
Saturday, November 12, 2005
Rosa Mexicano
Long story short, was invited to attend a 'dress rehearsal' at Rosa Mexicano, before their public opening. It was a great experience, with good company. We got to have more than our fair share of Pomagranite Margaritas, appetizers, entree & dessert...on the house...all so the staff could get use to the flow of the restaurant.
I signed up on their mailing list and have been recieving emails and brochures regularly.
I recieved on the other day with something I thought might be nice to have...for something!?!
Pomegranate Reduction
Reduccion de Granada
Makes: a litte more than 1/2 cup, but it is very strong so you only need to use a little for a lot of flavor.
1 tsp Olive Oil
1/2 small white onion, finely chopped
1 large garlic clove minced
1/4 tsp red chili flakes
1 pinch dried thyme
3 bay leaves
2 whole cloves
2 turns fresh cracked black pepper
2 cups pomegranate juice
4 tsp sugar
small pinch salt
In a small saucepan, saute the onion in the olive oil until translucent. Add the garlic, thyme, bay, black pepper, cloves and chili flakes. Cook for 1 minute more.
Add the pomegranate juice, sugar and salt, bring to a boil.
Reduce heat to medium and boil for 35/40 minutes or until it is 3/4 cup.
Strain through a fine sieve, pushing hard to obtain as much liquid as possible. Let cool and use later. Store in a jar or dish well covered ifor several days, or even weeks in the refrigerator. Perfect as a sauce for grilled beef, pork or chicken.
Korn Chowda
In February 2004, a certain someone was having a birthday and we decided to have a soup party. This was a great idea...I made three soups and had garnishes for each of them, so everyeone could serve up how they wanted. And I made enough for each person to try each soup, if they wanted. I had made my families Chicken Dumpling Soup, Cream of Roasted Red Bell Pepper and Corn Chowder.
Corn Chowder
(enough for at least four with leftovers, could easily serve six without)
2 medium onions, chopped
3 cloves of chopped garlic
2 TB butter
1 TB Olive Oil
2 Green Bell Peppers, diced (perhaps one green and one red for added color)
Salt & Pepper to taste
2 tsp
1 tsp Celery Salt
2 Bay Leaves
3 large potatoes, peeled and cubed
6 cups of stock (chicken or veggie)
1 cup heavy cream
1 cup milk
In a large pot, sauté the chopped onions in butter and olive oil over medium high heat, until softened and translucent, about 4 minutes. Add garlic, cayenne, celery salt, bay leaves, cook for about one minute. Stir in chopped bell pepper. Cook for about two minutes. Combine corn and potatoes, cook for one minute. Add stock and bring to a boil, reduce heat and simmer for about 20 minutes or until potatoes are tender. Reduce heat to low, stir in cream and milk. Allow to simmer for another 5 minutes.
Discard the bay leaves and serve. Have available some hot sauce or cayenne to bring up the heat level per each person’s desirable level. Serve with bread.
TIPS/HINTS:
1. I used a dried vegetable bouillon that needed to be "cooked" in water. Once the bouillon was boiling, I added the discarded parts of the onions and peppers (not the seed sack) to add a bit more flavor. I also added a small chunk of potato (and some peels). This will help to draw out some of the extra ‘saltiness’ that comes with prepared/packaged stocks/broths. Remove these items before adding the stock to the sautéed vegetables. I like to add about one extra cup of chicken stock to the vegetable stock, for another layer of flavor-but then it's not veggie friendly
2. I thickened up the chowder, just a small bit, after I added the cream and milk. One small mistake, because the chowder was just simmering…read on. I knew that the chowder was going to be a bit more ‘watery’ than I wanted, so I should have added a bit of cornstarch slurry before the cream and milk. Take one TB of cornstarch and about one TB of water, mix to combine, then add to the boiling soup. The cornstarch reacts to boiling water (not simmering) and will thicken the soup slightly. At this point, make sure to lower the heat to a simmer before adding the cream and milk.
3. You do not want to add cream or milk to boiling water. It can quickly separate and take on a curdled appearance and become unappetizing—I wouldn’t eat it, so I don’t know what it would do to the taste. I don’t know a quick fix for this problem, so you need to make sure that the soup is not boiling. The same goes for reheating any leftovers, slower bring to a simmer.
4. Seasoning/salting: When I add the onions, I add a pinch of salt. When I added the peppers, a bit of salt. Potatoes and Corn, more salt. Doing this makes sure that each layer’s flavors are amplified. Adding salt all at once, at the end, will make the chowder taste more salty than it actually is. And this being a bunch of ‘bland’ (corn, potatoes, cream, milk) ingredients, you will want to make sure to do this step.
5. Add ins: if I were to add chicken, I would do that after the soup comes to a boil, before adding the cream and milk—allowing about 8 minutes for the chicken to cook. Seafood: about three or four minutes before lowering the heat and adding the cream and milk. (again, don’t boil that chowder with the dairy.)
Dupont Grille
Last night we went to dinner after work. Both of us working in the Dupont/Farragut area, I was sent on a reconnaissance mission. I wanted something that we haven't been too, to much before. As I got to the circle, I remembered this place and having not been there, I took a look at their menu and thought why not.
The restaurant is on the ground floor of Jury's hotel.
The decor was simple. You're in a glass room, really. So as the review in the link above states, the surrounding neighborhood is the decor. I'm guessing if you are there are a warm evening you'd get some great people watching.
The menu had a few tasty things that I would like to try. Ultimately I had Steak Frites. It was pretty good. My understanding of the Steak Frites is that it is coated in cracked pepper, then grilled. This was just grilled, no cracked pepper coating. OK. Also, as I read in the review above, it was actually a London Broil. Again, it was good. The frites were really good, slightly over salted though. And I had to add a little extra salt to the steak. The steak had a compound herbed butter on top. I would suggest, if you get this dish, to request it on the side or not at all. The herbs were really good, but there was plenty of raw garlic...too over powering. I scooped the herbed butter off, which then left just a tasty grilled steak, that was a bitty little touch dry. So I stole the butter for the bread. From my little experience, you can't beat the Steak Frites at Les Halles on Pennsylvania Avenue. But this was good.
I had a glass of red wine...can't remember the name....of course....it was a dark, full bodied, dry wine. I tasted all sorts of yummy flavors in it. It paired well with the grilled meat.
J had the special--trout, stuffed with crab, wrapped in bacon, on cheesy grits, with a light hollandaise sauce. Sooo much was going on. To qoute Lady B: "Redickerus." Rediculous, but so much, much more! "Re-Dick-Er-Us"
I'll let J talk more about it, but the taste I had was tasty, but the fish seemed extra sweet, ok, but not what I would have wanted.
Two Entrees, two glasses of wine, tax and tip was about $80.
Since there were a few other things on the menu I'd like to try, I'd consider going again.
PS: there are about 20 little sparrows on my balcony gorging on feed that I just put out. It's cute.
Thursday, November 10, 2005
Contributed Recipe: Pasta Primavera w/Shrimp and Basil
This recipe was forwarded to me by Lady Brandenburg awhile back. I was cleaning out the "food" folder on the 'puter and thought it would be a good one to share....minus the broccoli for me!
Pasta Primavera w/Shrimp and Basil
8 oz uncooked angel hair pasta
1 cup broccoli, florets
2 tsp olive oil
12 oz shrimp, raw, peeled and deveined
1 small sweet red pepper, cut into thin strips
1 small yellow pepper, cut into thin strips
1 small orange pepper, cut into thin strips
4 oz green snap beans, trimmed and cut in half
4 oz asparagus, cut into 1-inch pieces
4 oz sugar snap peas, trimmed
2 tsp minced garlic
1/4 tsp table salt, or more to taste
1/4 tsp black pepper, or more to taste
2 cups grape tomatoes, cut in half
2 cups basil, fresh, cut into thin strips
3/4 oz Parmesan cheese, freshly grated (about 1/4 cup)
2 tsp lemon zest
Bring a large pot of lightly salted water to a boil and cook pasta. Add broccoli to pot about 1 minute before pasta will be done. Remove from heat and reserve 3/4 cup of the cooking water; drain pasta and broccoli in a colander. Heat 2 teaspoons of oil in a 12-inch skillet over medium-high heat. Sauté shrimp until just cooked through, about 2 to 3 minutes; transfer to a plate. Heat the remaining oil in same skillet. Add peppers, green beans, asparagus, peas, garlic, salt and pepper. Sauté until tender-crisp, about 4 to 5 minutes. Stir in reserved cooking water, tomatoes and shrimp; heat through, about 1 to 2 minutes. Return pasta and broccoli to pot. Add shrimp and vegetables, cheese and zest and basil; toss to mix and coat well. Serve immediately.
Wednesday, November 09, 2005
Turkey Noodle Casserole
Another of Rachel Ray's new recipes. Simple enough. Sort of a Turkey Helper kind of dish. I'll probably consider making this again. But some few changes.
Turkey Noodle Casserole
Serves 4
1/2 lb wide egg noodles
1 TB Olive Oil
3 Slices of bacon, chopped
1 lb ground turkey
1 lb white mushrooms, sliced (NOT IN MY HOUSE)
1 medium onion, chopped
Salt/Pepper
2 tsp ground thyme or poultry seasoning
1/2 cup dry white wine
1 cup chicken stock
1/2 cup heavy cream
Pinch of freshly grated Nutmeg ("It's what will make them go Mmmm.")
2 cups of grated Gruyere cheese
1 cup plain bread crumbs
handful of fresh chopped parsley
Bring a large pot of water to a boil for the noodles. When it boils, generously salt the water. Cook the noodles until al dente. Drain well and return to the pot.
In a large oven safe skillet, saute the bacon until crisp, in the olive oil. When done, set aside. Brown turkey burger, crumbling with a spoon or spatula. Move the meat to the side and add the mushrooms (NO WAY JOSE!) and onions, cook for 3 to 5 minutes, then stir together. Season the mixture with salt/pepper and thyme/poultry seasoning. Cook for another 5 minutes. Add the wine and deglaze with your spoon. Stir in the stock and bring to a bubble. stire in the cream and reduce heat to low. Add the nutmeg and stir. Taste and adjust seasoning if necessary.
Add the noodles to the mixture and stir. If you used an oven safe pan, leave in the pan and sprinkle with cheese and breadcrumbs. Place in the broiler for 2 to 3 minutes until crumbs are brown and cheese is melted. If you don't have an oven safe pan, lightly butter a casserole pan and then add noodle/turkey mixture, sprinkle cheese/crumbs, blah blah.
Garnish with parsley.
OK, here's my changes/suggestions:
I think that this could become a true "helper" dish by adding extra stock and adding the noodles and simmering for 10-15 minutes on the stove top. If anyone wants to try it out, let me know. I'll try it next time I make it.
Alright, g'night!
Turkey Noodle Casserole
Serves 4
1/2 lb wide egg noodles
1 TB Olive Oil
3 Slices of bacon, chopped
1 lb ground turkey
1 lb white mushrooms, sliced (NOT IN MY HOUSE)
1 medium onion, chopped
Salt/Pepper
2 tsp ground thyme or poultry seasoning
1/2 cup dry white wine
1 cup chicken stock
1/2 cup heavy cream
Pinch of freshly grated Nutmeg ("It's what will make them go Mmmm.")
2 cups of grated Gruyere cheese
1 cup plain bread crumbs
handful of fresh chopped parsley
Bring a large pot of water to a boil for the noodles. When it boils, generously salt the water. Cook the noodles until al dente. Drain well and return to the pot.
In a large oven safe skillet, saute the bacon until crisp, in the olive oil. When done, set aside. Brown turkey burger, crumbling with a spoon or spatula. Move the meat to the side and add the mushrooms (NO WAY JOSE!) and onions, cook for 3 to 5 minutes, then stir together. Season the mixture with salt/pepper and thyme/poultry seasoning. Cook for another 5 minutes. Add the wine and deglaze with your spoon. Stir in the stock and bring to a bubble. stire in the cream and reduce heat to low. Add the nutmeg and stir. Taste and adjust seasoning if necessary.
Add the noodles to the mixture and stir. If you used an oven safe pan, leave in the pan and sprinkle with cheese and breadcrumbs. Place in the broiler for 2 to 3 minutes until crumbs are brown and cheese is melted. If you don't have an oven safe pan, lightly butter a casserole pan and then add noodle/turkey mixture, sprinkle cheese/crumbs, blah blah.
Garnish with parsley.
OK, here's my changes/suggestions:
- Obviously no mushrooms! EVER!
- I didn't have bacon, it was alright, but I think the slight smokiness from the bacon would have been a nice addition.
- I didn't have Gruyere, so I added about a cup of grated parm to the breadcrumbs. Fine, but not really noticeable.
- I made this in advance and then put it in the broiler when we were ready to eat. It dried out a bit as my sauce reduced a bit longer than I should have let it. If you want to make it in advance, let the sauce remain "loose."
I think that this could become a true "helper" dish by adding extra stock and adding the noodles and simmering for 10-15 minutes on the stove top. If anyone wants to try it out, let me know. I'll try it next time I make it.
Alright, g'night!
Cake Love or Not To Love, THAT is the question
A few weeks ago, a few of us had a cathartic conversation regarding CAKE LOVE here in DC. We had our positives, but we had our negatives and ultimately said that Cakelove is overrated.
Tom Sietsema: Gang, I received the following earlier this week from cake baker Warren Love, who gave me permission to reprint it here. (I declined his offer to send me samples, but retried a few on my own, as an anonymous shopper.)
This was posted in today's Washington Post online chat with food critic Tom Sietsema:
Hello Tom,Warren Brown from CakeLove here.
I want to extend additional information about our products which it appears may clear up some confusion about how to serve products from CakeLove. I have seen on-line @ Ask Tom several comments that state CakeLove tastes like lard or is dry and is hard. To me, this suggests that people are eating the cakes, cupcakes, and other pastries at temperatures other than room temperature. We've seen similar comments in the past from customers who were eating the product straight from the fridge. Cold, butter based cake will taste just how your readers have described it. Because of that, we advise that everything from CakeLove be served at room temperature. To be sure, we refrigerate our products because of the fresh and perishable ingredients included, whether in the fillings or buttercreams. Not everyone wants to wait though and many people remain new customers, so we've renewed our efforts to make people aware of the importance of"serving cake @ room temp."At Love Cafe, we ask that customers wait 5-15 minutes before eating slices of cake, crunchy feet with buttercream, buzz balls, cupcakes or any other refrigerated pastry. At CakeLove where visitors and customers can get whole cakes and pastries to go, we ask/encourage people to leave whole cakes at room temp for no less than 60-90 minutes prior to slicing. The cheesecake is an exception that tastes good chilly or @ room temp. When I can, I give our cakes up to 4 hours before slicing into it.
In general, the longer the wait, the better the taste. I once had a Strawberry Shortcake after flying (unrefrigerated) to South Carolina with it from DC. The flavors @ room temp vs. refrigerated are markedly different. A customer once said the New German Chocolate cake is good cold but 10,000 times better when it's at room temp. I agree 100%.Under this renewed initiative to serve no cake before its time, we made palm cards in the spirit of a cautionary road sign. It features a person with a cake, a thermometer at 72 degrees, and the phrase "serve cake @ room temp". I hope people find it cute as well as informative. I'd be happy to send you the palm card so you can see it.
Also, we have a comprehensive serving guide on our new web site, cakelove.com. It's amazing how much scratch made cakes and pastries are a novelty in the market- especially those made with butter. We're happy to and welcome the opportunity to share with our customers and visitors the steps we encourage to really enjoy what we bake everyday. I would greatly appreciate it if you would share this info with your readers. In addition, I would like to send to your attention a sampler platter of our products for your review @ room temp. If you are interested, please provide me with a time and place for delivery.
Best Regards,
Warren Brown
CakeLove/Love Cafe
"Sugar Rush" on Food Network @ 9:30pm EST/8:30 CST
Tuesday, November 08, 2005
Tonight's Dinner
This is what we had for dinner tonight. First time in about five years I've made it. Some changes need to be noted, please visit the original post for my updated comments.
Sunday, November 06, 2005
First Test of Rachel's 365 No Repeats recipe
Decided to test a recipe in Rachel Ray's 365 No Repeats cookbook.
I ended up with the same basic dish, but changed some things and did a little improve along the way.
Cumin & Lime Roasted Pork Tenderloin
with Spicy Creamed Corn
Serves 4
FOR PORK:
2 1/4 lbs Pork Tenderloin (I used, for two servings, two thick Pork Loin Chops)
Juice of 2 limes
4 TB Olive Oil
2 TB Cumin
1 TB Coriander
Salt/Pepper
FOR CORN:
2 TB Butter
1 Large yellow onion, diced
2 Garlic Cloves, minced
2 Jalapeno peppers, finely diced
1 Small red bell pepper, diced
1 lb Frozen Corn
1 TB flour
1 1/2 Cup Broth (chicken or veg)
1/2 Cup Heavy Cream
Medium handful chopped cilantro
Here are my steps, as it will be easier than typing out what the book says, it follows pretty close.
1) Turn oven to 500. I mixed the olive oil, salt, pepper, cumin, coriander, lime juice, poured it over the pork and let it sit for about ten minutes. If I would have had longer, I think I would have, without the lime juice, as it will start to cook it if it sits too long.
If the pork is all you are doing, cook for about 20 minutes in the oven, turn 1/2 way through.
Let them set before serving for about 5 minutes.
If you're doing the corn, continue on.
2) Add butter to a medium high heat saute pan. Add onions, garlic, jalapeno and red pepper, saute for 5 minutes until onions are soft. I added a bit of lime juice (about 2 TB) and cumin here, about 1/2 tsp. Add corn, stir to incorporate and come to temperature.
3) Sprinkle on flour, cook for 2 minutes. Add broth, stir. Add cream, stir. Lower temperature and let simmer and bubble until thick and creamy. It will continue to thicken. I kept mine going for about 10 minutes while the pork cooked. Prior to serving, throw in cilantro, stir.
For serving, I garnished pork and corn with chopped cilantro.
That's really it. It was tasty. Tart and smoky. I would make it again and I would serve it too guests.
Thanksgiving Side-Drunken Cranberries
I first had homemade cranberry sauce with Thanksgiving dinner in 1998. I was very apprehensive, because I’d only ever had the canned jellied cranberries, which I was fond of—and they still make a special appearance every year on the Thanksgiving table…love those ridges from the can! I was watching as they were made and thought that it was really cool watching these tart, hard little berries become this tangy classic side dish.
I began the following year’s Thanksgiving preparations by trying my own hand with homemade cranberry sauce. I wanted to try something a little special and decided to add two types of liquor.
The result was very good, but still more tart than I would have liked. The next year I tried adding a can of crushed pineapple to the cranberries. This was perfect! The crushed pineapple blends right into the dish, most people don’t even realize that it is there.

Yield: Approximately 1 Quart (8 to 12 servings)
Cooking Time: Approximately 20 minutes
1lb Fresh Cranberries
¼ cup of bourbon
¼ cup of triple sec
1 orange, juiced—it’s ok if pieces and chunks are included, but no seeds.
1 lemon juiced—ditto
1 cup sugar
large (14-16oz) can of crushed pineapple
1/3 cup of the pineapple juice from the can
Combine bourbon, triple sec, sugar, orange & lime juice. Simmer until sugar is dissolved.
Add rinsed and cleaned cranberries. I remove any cranberries that are soft or damaged.
Stir into the sugar, coat all the cranberries. Continue to simmer, stirring frequently, until cranberries POP! (about 10 minutes)
Remove from heat and add crushed pineapple and it’s juice.
Stir until completely mixed.
REFRIGERATE, served COLD.
For the cranberries, I buy them, a few bags prior to Thankgiving and I throw them in the freezer, where they freeze perfectly and last the full year. I’ve also popped out a few to use as garnish in Cosmopolitans!
This will kill ya'
My southern soul mama is on tv now, so I decided to share this recipe.
I made this recipe for a dinner party. I think we started crying as we ate it....soooo good! And wow, it was easy.
I think I've made this three or four times now. The first time, exactly as it was written. Amazing. Using the Chessman Cookies really is great for display and they have a great taste. The second time I made it, I split the recipe in two, 1/2 in one small square foil pan and the other 1/2 in another. One for home, one for the party. Another time I made it, I used low-fat cream cheese and there is a no or low fat sweetened condensed milk you can get. So a little better for you and I couldn't taste the differences. Really yum! Yum! Yum! Yum. Paula I love you! As for the serving suggestions. That's about right, but I've seen it stretch to feed more and I've seen it devoured by less!
I made this recipe for a dinner party. I think we started crying as we ate it....soooo good! And wow, it was easy.
Not Yo' Mama's Banana Pudding
Recipe by Paula Deen
Prep Time: 30 minutes Yield: 12 servings
2 bags Pepperidge Farm Chessmen cookies
6 to 8 bananas, sliced
2 cups milk
1 (5-ounce) box instant French vanilla pudding
1 (8-ounce) package cream cheese, softened
1 (14-ounce) can sweetened condensed milk
1 (12-ounce) container frozen whipped topping thawed, or equal amount sweetened whipped cream
In a bowl, combine the milk and pudding mix and blend well using a handheld electric mixer. Using another bowl, combine the cream cheese and condensed milk together and mix until smooth. Fold the whipped topping into the cream cheese mixture. Add the cream cheese mixture to the pudding mixture and stir until well blended. Pour the mixture over the cookies and bananas and cover with the remaining cookies. Refrigerate until ready to serve.
I think I've made this three or four times now. The first time, exactly as it was written. Amazing. Using the Chessman Cookies really is great for display and they have a great taste. The second time I made it, I split the recipe in two, 1/2 in one small square foil pan and the other 1/2 in another. One for home, one for the party. Another time I made it, I used low-fat cream cheese and there is a no or low fat sweetened condensed milk you can get. So a little better for you and I couldn't taste the differences. Really yum! Yum! Yum! Yum. Paula I love you! As for the serving suggestions. That's about right, but I've seen it stretch to feed more and I've seen it devoured by less!
Saturday, November 05, 2005
Happy 100th Post
This wasn't planned for the 100th post, but I had to get this out there.
Food Network is previewing a show from FINE LIVING.
OMG! I've been having a mild love affair with Andrea Immer for years. She has her own show, Pairings with Andrea. Damn!!! I wish we got Fine Living with our cable package!
Andrea Immer is a Master Sommelier and has several books. I have three:
Great Wine Made Simple
Great Tastes Made Simple
Everyday Dining with Wine
I bought Great Wine Made Simple a few years back. In that book, she focuses on the Big Six grapes and strives to make wine make sense for the non-Sommeliers amongst us. I loved the book, I had to get the next where she begins to work with wine pairings. The third book is more about cooking with wine. All the books are easy to use and a joy to read.
So, what are the Big Six according to Andrea?
Riesling
Sauvignon Blanc
Chardonnay
Pinot Noir
Merlot
Cabernet Sauvignon
In this episode she's made:
Swiss Chard with raisins and toasted pine nuts (paired w/ Chardonnay)
Drop Biscuits (w/ Chardonnay)
Cheese Grits with Shrimp and Chorizo (w/ Zinfandel)
Chocolate Scotch Bars (w/ Zinfandel)
Since I didn't catch the beginning of the episode, so I'm wondering if she focuses on two wines per episode? Anyone?
I hope I get to see more previews from Fine Living with Andrea Immer.
She gave a final tip. Pink Lemonade for kids or folks who don't want wine. The tangy acidity works as well as wines in pairings. Another thing she is doing. Putting two glasses at each setting and pouring both wines, to have both at the same time with dinner, to go back and forth.
OMG! I get another episode!
She does, takes two wines and works them into the episode. This one, Gewurztraminer and Zinfandel=Thanksgiving Dinner! You go girl!
OK, enough chatting, here is her recipe for:
Cheese Grits with Shrimp and Chorizo
from Everyday Dining with Wine
Serves 4
4 oz. chorizo, cut into 1/4 inch dice
1/2 tsp salt, plus more for taste
1 cup quick cooking grits or instant polenta
2 TB unsalted butter
1 lb medium shrimp, peeled and deveined
2 medium garlic cloves, minced
1/2 cup grated Manchego cheese (Mmmm)
Ground black pepper
2 TB finely chopped chives, optional
1. Cook the chorizo in a heavy, medium skillet over medium heat, until crisp, 2 to 3 minutes. Transfer the chorizo to a paper towel lined plate to drain. Pour off all but a thin film of fat from the skillet.
2. Bring 4 cups of water and 1/2 tsp of salt to a boil in a medium saucepan. Slowly stir in the grits. Reduce heat to low and cook about 5 minutes, whisking occasionaly, until the grits are thick and smooth.
3. While the grits are cooking, add 1 TB of butter to the skillet and heat over medium high until the butter is foaming. Cook the shrimp until just pink, turning once, about 3 minutes. Stir in the chorizo and garlic and cook, stirring constantly, until the garlic is fragrant, about 30 seconds longer.
4. Stir the remaining tablespoon butter and the cheese into the grits and season with salt & pepper. Spoon the grits into 4 warmed bowls and top with the chorizo and shrimp. Sprinkle with chives, if desired. Serve immediately.
Ahhh, I feel very satisfied with my Saturday.
Food Network is previewing a show from FINE LIVING.
OMG! I've been having a mild love affair with Andrea Immer for years. She has her own show, Pairings with Andrea. Damn!!! I wish we got Fine Living with our cable package!
Andrea Immer is a Master Sommelier and has several books. I have three:
Great Wine Made Simple
Great Tastes Made Simple
Everyday Dining with Wine
I bought Great Wine Made Simple a few years back. In that book, she focuses on the Big Six grapes and strives to make wine make sense for the non-Sommeliers amongst us. I loved the book, I had to get the next where she begins to work with wine pairings. The third book is more about cooking with wine. All the books are easy to use and a joy to read.
So, what are the Big Six according to Andrea?
Riesling
Sauvignon Blanc
Chardonnay
Pinot Noir
Merlot
Cabernet Sauvignon
In this episode she's made:
Swiss Chard with raisins and toasted pine nuts (paired w/ Chardonnay)
Drop Biscuits (w/ Chardonnay)
Cheese Grits with Shrimp and Chorizo (w/ Zinfandel)
Chocolate Scotch Bars (w/ Zinfandel)
Since I didn't catch the beginning of the episode, so I'm wondering if she focuses on two wines per episode? Anyone?
I hope I get to see more previews from Fine Living with Andrea Immer.
She gave a final tip. Pink Lemonade for kids or folks who don't want wine. The tangy acidity works as well as wines in pairings. Another thing she is doing. Putting two glasses at each setting and pouring both wines, to have both at the same time with dinner, to go back and forth.
OMG! I get another episode!
She does, takes two wines and works them into the episode. This one, Gewurztraminer and Zinfandel=Thanksgiving Dinner! You go girl!
OK, enough chatting, here is her recipe for:
Cheese Grits with Shrimp and Chorizo
from Everyday Dining with Wine
Serves 4
4 oz. chorizo, cut into 1/4 inch dice
1/2 tsp salt, plus more for taste
1 cup quick cooking grits or instant polenta
2 TB unsalted butter
1 lb medium shrimp, peeled and deveined
2 medium garlic cloves, minced
1/2 cup grated Manchego cheese (Mmmm)
Ground black pepper
2 TB finely chopped chives, optional
1. Cook the chorizo in a heavy, medium skillet over medium heat, until crisp, 2 to 3 minutes. Transfer the chorizo to a paper towel lined plate to drain. Pour off all but a thin film of fat from the skillet.
2. Bring 4 cups of water and 1/2 tsp of salt to a boil in a medium saucepan. Slowly stir in the grits. Reduce heat to low and cook about 5 minutes, whisking occasionaly, until the grits are thick and smooth.
3. While the grits are cooking, add 1 TB of butter to the skillet and heat over medium high until the butter is foaming. Cook the shrimp until just pink, turning once, about 3 minutes. Stir in the chorizo and garlic and cook, stirring constantly, until the garlic is fragrant, about 30 seconds longer.
4. Stir the remaining tablespoon butter and the cheese into the grits and season with salt & pepper. Spoon the grits into 4 warmed bowls and top with the chorizo and shrimp. Sprinkle with chives, if desired. Serve immediately.
This recipe marries two of my favorite dishes--low country shrimp and grits, and the Spanish tapa of shrimp and chorizo bits sizzled together with garlic. Using Manchego cheese in the cheese grits keeps with the Spanish theme, and contributes enough richness that you don't need cream or milk in the grits or sauce--so while it's not spa cooking, this dish isn't as heavy as traditional shrimp and grits. The earthy corn taste of grits is great with the earthiness of old style, spicy Spanish Riojas and Ribera del Dueros. Quick-cooking grits, smoked sausage and quick cooking shrimp make this dish a great weeknight choice. For extra convenience, I use the frozen bags of peeled and deveined uncooked shrimp.Interesting. In the book she recommends the Roijas, but on the show a Zinfandel. Not knowing too much about the Roijas, I'm guessing it has a peppery spice or thick jammy taste that would pair up well with the spicy chorizo. Anyone? Comments?
Ahhh, I feel very satisfied with my Saturday.
Book Review: Rachel Ray 365: No Repeats
 Rachel Ray 365: No Repeats
A year of deliciously different dinners a
30-minute meal cookbook
about $20
This is the largest of Rachel Ray's cookbooks. I have four others; 30 Minute Meals, 30 Minute Meals 2, Cooking Round the Clock, Get Togethers. These are all 30 Minute Meal cookbooks...and as I've mentioned before, that's nice, but they usually are longer than 30 minutes if you take the time to clean and prep your stuff as you go.
The book is 318 pages, plus the index.
There is no ryhme or reason behind how the recipes are arranged, not by main ingredient, style of cooking. They are just in there. Rachel explains this in the introduction, essentially, her plan is that you just cook your way through the book. This way you are not having chicken for four weeks, then beef, the veggies, etc. OK. There is a category listing in the front, so if you just want pasta, you can quickly find pasta recipes.
Each recipe is numbered, 1 through 366. She gives us a 'bonus' recipe, which happens to be her "Christmas Pasta." Which is good, I've made it before.
Next to each title are two little boxes for marking: "Try it Later" or "It's a Keeper." I would add, "Not for me" or "You're kidding right?" Recipe #9 is missing these boxes...oops!
Of the 366 recipes, I have marked, with post its, about 20 to try right away. Some of them are:
Turkey Noodle Casserole
BBQ Chicken Sandwiches (I refuse to use the Rachel term "Sammies".)
Chipotle Chicken Chili Mac
Bel Aria Chicken & Pasta
Pineapple Rum Chicken
Cajun Meatloaf
Grilled Chicken Paillard
and many more.
To help stretch the recipes to 366, Rachel has a good idea. She will give you a master recipe, then a few variations afterwards, now each of the variations is considered it's own recipe and some of them are pretty simple and one would probably think of it themselves. But for beginner chefs, I think it's great to get people thinking that way.
There is a downside to this idea. If you decide to do one of the variations of the master recipe, you really might need a pad and pen to re-write the recipe to understand it. The main ingredient listing is with, for example, recipe 48. Then for 49, there is a variation, all she says is to remove ingredients x, y, z. Substitute 1, 2, 3. Change order to a1, c9, b12. So for a new chef, this might be challenging. And if you just want to open the book and do a 30 minute meal, you're going to need to spend some time clarifying the recipe.
Another downside of the book is the way some of the recipes are described. There will be a dish X with side dish 78. You may really want to try dish X, but have no interested in side dish 78. As the recipe is listed as one long recipe, you will need to distill the portion of the recipe you want. Does that make sense?
To fix these two things, the book would probably come in closer to 500 pages. A bit big for everyday use.
Would I recommend this book to someone. Depends. I would for someone who is a casual home cook with some time under their belt. I don't think I would as a first cook book or a beginner cook. For the two reasons I've listed above.
But overall, I think it's pretty good. In terms of variety of it the best of Rachel's books.
Now, on to testing the recipes.
Thursday, November 03, 2005
Eastern Market
Most of our regular readers know that I lived on Capitol Hill since the fall of 2000, until this past spring when, for financial reasons-mostly, we moved to the near suburbs to save some money.
During most of that time we worked on the Hill as well.
The number one thing that I miss the most, on a near daily basis is Eastern Market (and here). I would do most of my shopping there, get lunch there and just wander the stalls on the weekends. If you haven't been, please go and support the vendors and artists that make Eastern Market one of the greatest gems of the city.
Now that I don't live on the Hill, many of my visits are coordinated with my visits to either my Dr., Dentist or Eye Dr....but I know that I'll be making a major pilgrimage 11/22, to get most of what I need for Thanksgiving.
And right after Thanksgiving...what did I do on a daily basis until Christmas...walk through all the pine trees hanging under the canopy. I loved it and miss it.
Wednesday, November 02, 2005
Dead
She's dead to me. I've only had a mild to moderate hatred for her...but mostly I love the reaction she brings out of J.
But as of today, she is officially dead to me.
Now, I'm 100% in favor of making cooking as easy as possible to get as many people as possible cooking at home...but this skeleton has just crossed the line.
Kraft Parmesan Cheese in risotto! You're kidding right? Right?
I hope I don't offend any of you with this, but with a classic dish like risotto, please, please, please use real deal, Parmigiano Reggiano, you'll thank yourself.
Now, I think that's what I'm going to make myself for dinner, a bowl of risotto.
Big, Thick, Hearty Thighs
That is the name of recipe #50 from Rachel Ray's newest book, 365 No Repeats; A Year of Deliciously Different Dinners. I haven't gone into it as I'm actually quite busy today, but I think we might be in for an adventure and I'm not sure what kind that will be!
I just find the name of the recipe funny. My first glance was: Big Thick Meaty Thighs. And that made me laugh.
I'll let you know later how the rest of the book is.
I just find the name of the recipe funny. My first glance was: Big Thick Meaty Thighs. And that made me laugh.
I'll let you know later how the rest of the book is.
Tuesday, November 01, 2005
Playing with your food
You should visit here!
It's in French, so a bit of a challenge for us who don't read/speak French.
Navigation
-First page should have a note at the bottom right, click it. (Passer l'intro)
-Center of the page is: "mimimiam." Click it...three small balls will twirl and go to the bottom right corner, merging into one.
-Hover our cursor on the one ball. Your menu will pop up. There are five categories under "Galerie." That's where you want to go and puruse. Start with the first....the three balls will be at the bottom right again as navigators, forward, back and menu.
Scroll Through and Enjoy.
 A sample of the delectable art inside!
Thanks Andy!
Fennel Orange Salad
Tonight we're having "Wild Rice" Soup. I wanted something else to go with it, but didn't want to do too much. So we decided it was a good time to try this. Not that they really go together, but hey, why not!
Fennel
Serves 4
2 medium fennel bulbs (8 ounces each), quartered, cored, and thinly sliced crosswise
5 oranges
2/3 cup fresh parsley leaves
2 tablespoons slivered pitted black olives
1 teaspoon olive oil
Coarse salt and freshly ground pepper
1. Using a paring knife, remove the peel and pith of the oranges. Separate oranges into segments over a large bowl (to catch the juices), then add segments to bowl.
2. Add fennel, parsley, olives, oil; season with salt and pepper. Gently toss, and serve.
I don't like olives, so I'm skipping them. Since we're trying this for the first time, I'm going with one fennel bulb and maybe two oranges, I'll play that part by ear.
Subscribe to:
Posts (Atom)
