Monday, January 31, 2011

Creme Brulee!

Hey guess what? My tiny little blog that I have been operating since 2005. My tiny little blog that over the past year and a half to two years has averaged only 60-75 visitors a day. Well, my tiny little blog has surpassed 100,000 visitors, since I started tracking in 2006! Woo hoo!!! Thanks readers. A special thanks to DCBlogs for featuring my post, which in turn pushed me over 100,000!

So a few weekends ago, I had this awesome dinner party. I don't pull out all the stops that often, but this time I did. After treating people to fun nibbles to start, we sat down for a great dinner (that post is coming down the line!) Of course at this point, we were stuffed to the gills. No reason to eat anything else. But that would be foolish. So dessert is a MUST! And what a perfect dessert it was!!!

Le Cirque's Creme Brulee

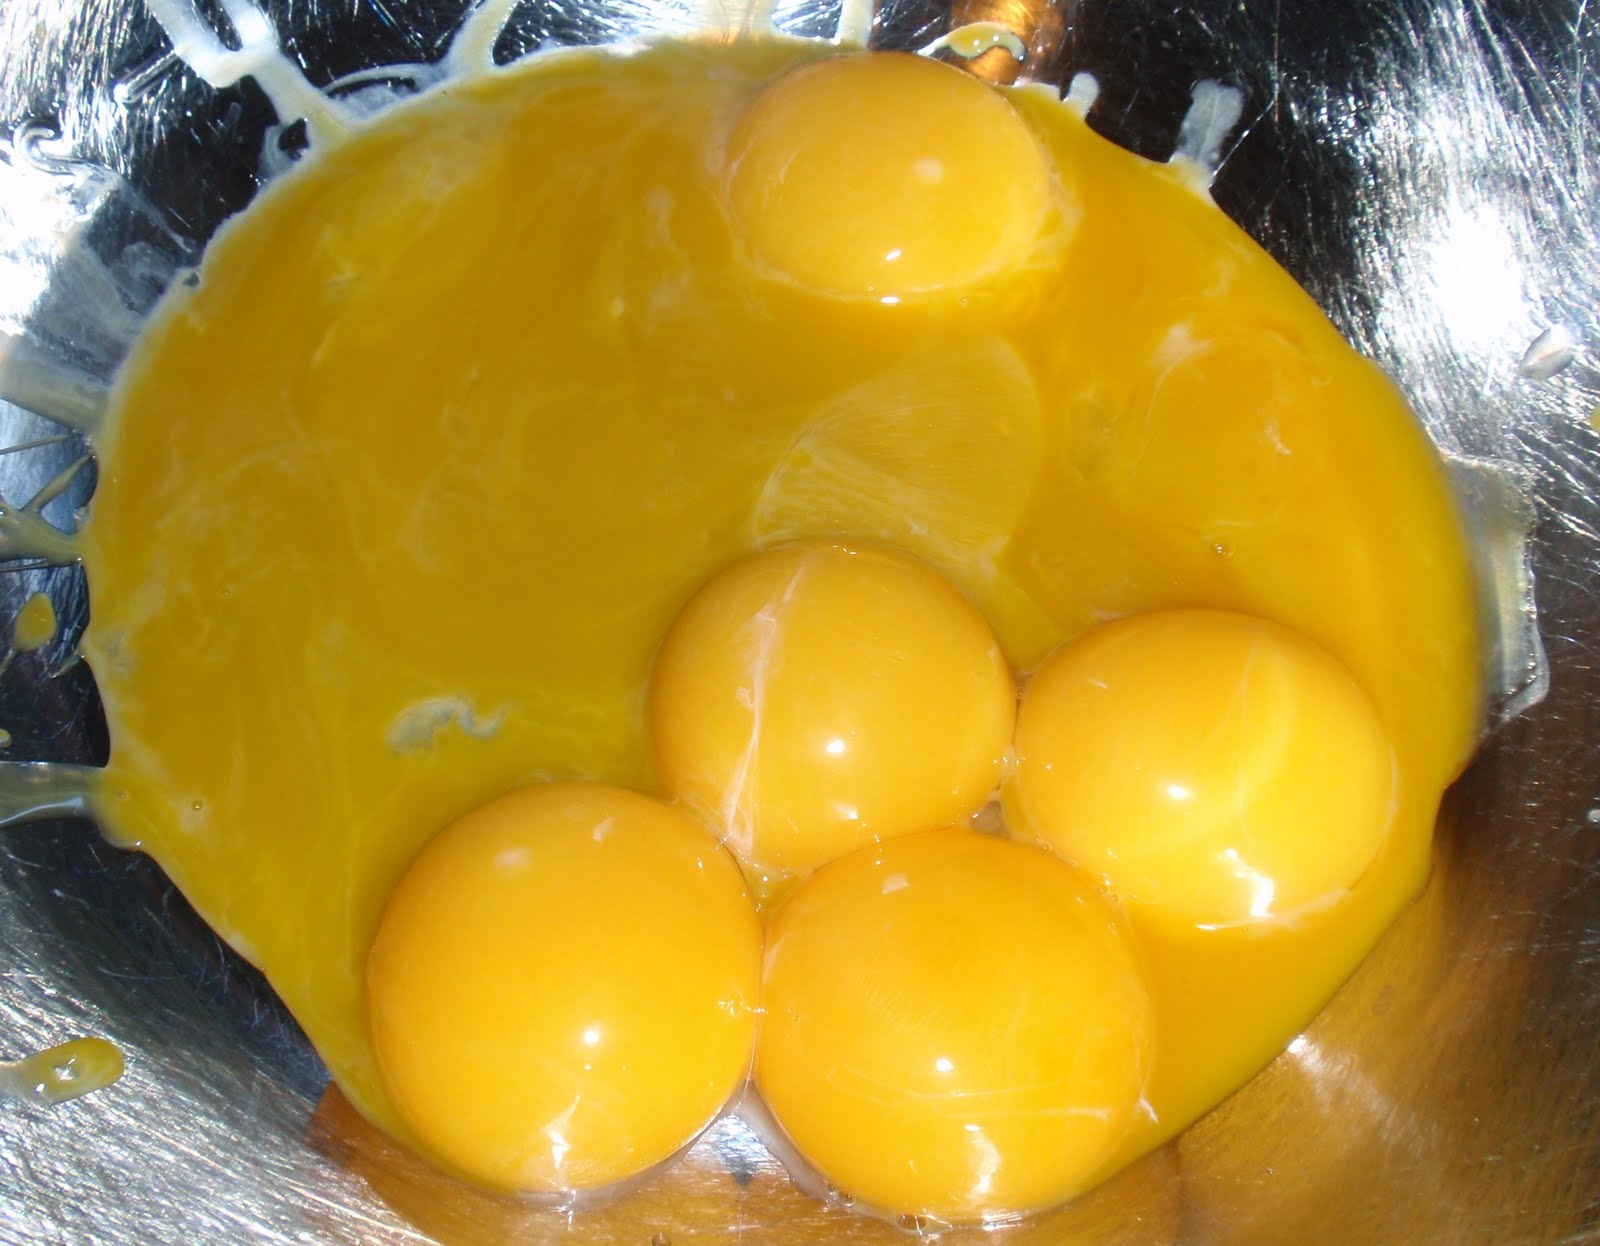
Creme Brulee starts with the best eggs you can get. Farm fresh is best! Organic and/or free range is the next best. But whatever, make sure they are fresh and the best you can get. The egg whites can be frozen and saved for a later use, perhaps a pavlova.

Mix the egg yolks with sugar. That amazing orange yolk will turn to a beautiful pale yellow.

Of course, like the eggs, get the best heavy cream you can. I wish I had easy access to a dairy. Alas, I went with an organic heavy cream from my local market. Heat the cream with vanilla bean/seeds. And if your naughty and have a good quality vanilla extract, a little extra shot will shoot your creme brulee to the moon! But don't tell anyone, that's our little secret.

Once the cream and vanilla have steeped for awhile, slow pour the cream into the eggs, stirring as you go. But do go slow. If your cream is too warm/hot and you go to quick, your yolks will scramble. If it helps you, add a few spoonfuls of the cream to the egg yolks, stir, add a little more, stir and eventually you can start pouring the cream. Once all the cream is in the eggs, make sure to scrap the pan. You want all those vanilla seeds from the pot into the mixture. Strain the final mixture through a fine mess strainer to remove any bits and bobs. That could be part of the vanilla pod. Or perhaps a stringy bit of egg.

**At this point, the custard can be sealed up and let in the fridge, which I did, for two days.

When you're ready to cook, pour the custard into the ramekins. The ramekins will need to be placed in a larger baking dish, which I have lined with a clean towel. Once the custard is in the ramekins and the pan in the oven, carefully pour warm water into the pan, at least halfway up the ramekins. This will facilitate a slow, steady, gently heating and cooking of the custard--guaranteeing a super smooth custard!

Bake! Once cooked, remove the ramekins to a tray and place in the refrigerator for several hours to become fully chilled. You don't want to serve warm or room temperature creme brulee. I think chilled is best!

To get the infamous crackle, bruleed topping, you need to sprinkle with sugar. I used three types of sugar. No reason, but something I did the first time I made creme brulee...still do it now. Make sure the topping is a 'lite' topping. Too much will make it very hard to have a thin, crisp crackled top...to as I say, not as I do!

I had too much sugar on my cremes. I couldn't get it all melted without truly burning the sugar, which you don't really want to do to much of. Any more than this in color, which start to get bitter. Dark brown, not black! So give the sugar a gentle hand. If you can, garnish the creme brulee with some fresh berries. Raspberries and blueberries are my favorite. They go great with the rich creme.

Despite the heavy hand with the sugar, my topping was light shattering glass! The custard was amazingly rich, soft, smooth, full of vanilla and just the right amount of sweet.

Of the six of us at dinner, only two of us finished our creme brulee. These bowls were a little too big. Each was 3/4 of a cup of custard. If we hadn't gorged ourselves on all the amazing vittles before hand, I'm sure all would have finished our dessert. That being said, one of the ramekins was licked clean at the end of dinner!!!


Le Cirque's Creme Brulee
from The Essential New York Times Cook Book by Amanda Hesser

Serves 6-8

4 cups heavy cream
1 vanilla bean, split, sees scraped out and reserved
Pinch of salt
8 large egg yolks
3/4 cup plus 2 TB granulated sugar
1/2 cup packed light brown sugar

1. Heat the oven to 300 degrees. Place eight 6-ounce ramekins in a roasting pan. Combine the cream, vanilla bean and seeds and salt in a saucepan set over low heat and warm for 5 minutes.

2. Gently whisk the egg yolks and granulated sugar in a large bowl. Gradually pour in the hot cream and stir gently to combine. Strain the custard into a pitcher; discard the vanilla bean and use a spoon to skim off any bubbles on the surface of the custard.

3. Pour the custard into the ramekins, filling them almost to the rim. Place the roasting pan in the oven and carefully pour warm water into the pan until it reaches halfway up the sides of the ramekins. Loosely cover the pan with aluminum foil. Bake until set, 1 to 1 1/4 hours. Remove the ramekins from the water bath and allow to cool.

4. Cover the ramekins individually and refrigerate for at least 3 hours, or for up to 2 days.

5. When ready to serve, heat the broiler. Uncover the ramekins and place them on a baking sheet. Top each with 1 TB of brown sugar, and using a metal spatula or your gingers, spread the sugar evenly over the custards. Broil the custards about 4 inches from the heating element until the sugar browns and caramelizes, 30 seconds to 1 minute. *Use a blowtorch, if you have one, to caramelize the sugar on top.

NOTES: I had 6 matching ramekins. I tested how much custard they could hold, by filling them with water, then measuring that amount. Each of my ramekins held 3/4 of a cup of the custard. That was exactly how much this recipe made. Six ramekins of 3/4 cup of custard.

As noted above, I used a blend of three sugars, granulated white sugar, brown sugar and turbinado sugar. Not necessary, but interesting.

Wednesday, January 26, 2011

French Onion Tartlets

At our recent dinner party, I wanted to greet the guests with a bubbly drink and a little nosh. One of the nosh items was something I came up, sort of on the fly. I played around with making an onion & sage tart, but I just wasn't feeling it. Being a French themed dinner, I also really wanted onion soup, but didn't want to go over board on the. What if...I could make incorporate the two?

French Onion Tartlets!!!

I started with two large sweet onions. They were diced and tossed in a non-stick skillet with butter, thyme, bay leaf, salt and pepper. Cook slow and low for about 45 minutes. The onions will caramelize and reduce down.

After the onions cooked down, I added a quarter cup of a dry white wine. I allowed that to mix in and simmer do to nothing. Next was some apple juice--I'd have preferred cider, but I didn't have it. Simmer that down to nothing. Finally I added some beef stock and simmered that down, about 1/2 cup. You don't want this to actually be soup. A nice thick consistency will be best. Once I had the consistency I wanted, I stirred in a tablespoon of cider vinegar. At the moment, that seemed like a mistake, but the vinegar made the flavors pop later on! I placed the mixture into a bowl and kept it in the fridge for about 3 days before I continued the tartlets the day of the dinner party.


Now...how to make the tarts? Use the recipe here, roll out and cut into small circles with a biscuit cutter, about 2-2 1/2 inch diameter...it might have been 3 inches??? Carefully place the circles into a mini-muffin tins. I forgot, but you should prick the pastry with a fork. You'll need to bake these in the oven for about 15 minutes...350 degrees. They will be puffy and golden brown. Allow to cool.

Each tart shell took about 1 full teaspoon of the onion mixture. I topped each tartlet with a small bit of shredded mozzarella. I would have preferred Gruyere, but I forgot to get some at the store. Put them back in the oven, 350 again, for about 10-15 minutes. This allowed the onion mixture to heat back up and the cheese to melt.

These were tasty little devils. I made enough for at least 12 people, but the 6 of us finished almost all of them off!!! Serve them hot and with a glass of wine. Enjoy.

Monday, January 24, 2011

Dinner Party

As much as I enjoy cooking and entertaining, I don't entertain, truly entertain, all that often. But when I do...I pull out the stops. Two weekends ago, we had a nice little gathering, 6 of us total. If you want to get into the business of entertaining, I think there are two things to plan on. 1) Plan a menu that can mostly be prepared in advance so you don't have to spend all your time in the kitchen otherwise spending time away from you guests. 2) Prep and organize in advance so you don't forget something. Figure out what you are serving and what dishes you'll need. What serving utensils will you need? Do you have the glasses you need?

For four people, I had the entree plates, salad plates, forks, knives and spoons. Coffee cups and ramekins. There were antique crystal champagne goblets for when our guests arrived. Wine glasses for dinner and wine glasses for an after dessert tasting. Don't forget water glasses. I also had some of the serving platters.

For Christmas, I got this book for table settings. I had to try out a special fold! This was the "shield."

I preset the table a few hours before the guests were scheduled to arrive. The wine was put out a few minutes before they arrived. Pitcher of water. Bread basket. BTW, the table line, is the inspiration for the paint we'll be working into our dining room in the near future. Yellow. With blue accents and a few pops of red. Very Provencal.

During dessert. All that was left was wine, coffee and creme brulee! That's only about seven actual bottles of wine. One unique way to have water on your table...recycle wine bottles. Wash them out, remove the labels and voila! Pre-fill them and keep them in the fridge before the party.

Stay tuned over this week for the menu & more photos. It was a great dinner and I look forward to the next one. This was a French theme...I'm curious what the next theme will be?!?!

Sunday, January 09, 2011

Curried Turkey

This was a pretty fast, super easy recipe for a filling, flavorful dinner. There is a lot of flexibility to this dish as well, you can change up the ingredients based on what you have in the house! Give it a shot. Oh, and it's a one-pot meal too, so clean up is easy peasy.

Curried Ground Turkey with Potatoes
Start with ground turkey (or chicken, or pork...), brown in a skillet with a small amount of oil. My turkey seemed to release a lot of liquid. Give this a chance to cook off, then add chopped onion, chile, garlic and ginger. Saute for a minute or two to soften the onions. Then add the spices. Curry powder or Garam Masala, coriander, cumin and a small pinch of tumeric. Allow spices to toast, then add broth or water, stir to combine.

Add diced potatoes to the mixture. Add a little extra water if you need, to make sure the potatoes are covered. Cover the skillet and cook until potatoes are tender, about 10-15 minutes, depending on the size of the potato. Stir once or twice during that time.

Add some green beans or peas...or other veg would work. Also add diced tomato, canned or fresh. Simmer for 3-5 minutes until the veg are cooked through. These were frozen green beans, so they only needed to heat up. Top with chopped cilantro.

This is a pretty complete meal as is, or you can serve with rice or flat bread. The choice is yours. I loved how easy the meal was. Plenty of good flavor, hearty and filling, and pretty healthy. I only used about 2 teaspoons of olive oil in the whole dish. The turkey was very lean as well.

Curried Ground Turkey with Potatoes
From Simply Recipes

3-4 TB vegetable oil
1 pound ground turkey (thigh meat if you can get it)
1 chopped onion
2 chopped garlic cloves
1-2 chopped fresh red chiles (optional)
A 1-inch piece of peeled ginger, grated fine
1/2 cup water
Salt to taste
1 TB garam masala (or curry powder)
1 tsp turmeric
1 tsp cumin
1 tsp ground coriander
2 large Yukon Gold potatoes, peeled and cut into 1-inch chunks
2-4 Roma or other plum tomatoes, diced
1 cup fresh or frozen peas
1/2 cup (loosely packed) chopped cilantro or parsley


1. Heat the vegetable oil over medium-high heat in a large pot with a lid. When the oil is hot, add the ground meat, spreading it out over the pan. Try not to crowd the meat (you may need to cook in batches). Cook the meat without stirring, until it begins to brown.

2. Add the chopped onion and chiles. Stir and sauté for 4-5 minutes, or until the onion begins to color a bit. Sprinkle salt over everything.

3. Add the grated ginger and garlic, mix well and sauté for another 1-2 minutes.

4. Mix in the spices, water, and the potatoes. Stir to combine and cover. Turn the heat down to medium-low and simmer for 15-20 minutes, or until the potatoes are tender.

5. When the potatoes are tender, add the diced tomatoes and peas. Mix well and cover the pot. Cook 2-3 minutes. Add salt, if needed, to taste.

6. Right before you serve, mix in the chopped cilantro. Serve alone or with flatbread or white rice.

Serves 4.

Scott's Notes:
*I used only 1-2 teaspoons of olive oil
*There were no red chiles, so I used one jalapeno
*I needed about 1 full cup of water to help the potatoes cook, most of this water evaporates, but you are left with a little "sauce" in the pan
*I used a little extra garam masala and probably 1/8 of a tsp of tumeric
*I used canned diced tomatoes, which I drained, probabaly 1/2 a can. Also used frozen green beans.

Wednesday, January 05, 2011

So much goodness

Give yourself some time and make a giant pot of delicious Ragu alla Bolognese!


We start by making a Pestata. A finely minced blend of pancetta and garlic.

After cooking the pestata, add some minced carrot, celery and onions. Add wine, beef, pork and tomatoes.

Simmer for over three hours, adding broth as the sauce reduces.

And serve with pasta!

The recipe is huge! You need a large pot. I pulled out the largest I have. A 12 quart stock pot. You don't want to start and then have to shift to multiple pots. With the full batch, I made one 8x8 pan of baked ziti, 3 bowls like the one above. I have one container for a weeknight, quick meal in the freezer, and another large batch frozen for some lasagna later on.

Ragu alla Bolognese, Ricetta Tradizionale
From Lidia Bastianich

2lb ground beef
2lb ground pork
2 cups dry white wine
6 oz bacon or pancetta
5 fat garlic cloves
2 TB extra-virgin olive oil
2 medium onions, minced in a food processor or finely chopped
2 large stalks celery, minced in a food processor or finely chopped
1 carrot, shredded (or minced in a food processor or finely chopped)
Salt/Pepper

2 cups dry red wine
2 TB tomato paste
2 cups plum tomatoes passed through a food mill
8-12 oz broth (Lidia calls for turkey or vegetable, I did 3/4 chicken, 1/4 beef)
Salt/Pepper

* Put all four pounds of meat in a large mixing bowl. Crumble and mix together. Pour in the white wine and stir to incorporate, with the meat evenly moistened.

* Cut the pancetta in to chunks and put in a food processor with the garlic. Process until finely minced.

* Pour the olive oil into the heavy saucepan and scrape in all of the pancetta/garlic mixture (aka Pestata). Stir and cook for 3 minutes or more, rendering the fat, over medium-high heat.

* Stir in the minced onion and cook for a few minutes until the onions are sizzling and starting to sweat.

* Stir in the celery and carrot and cook until wilted and golden. About five minute or more. Stir frequently.

* Turn heat up, closer to high. Push the vegetables to the side and add the meat mixture. Sprinkle with salt. Allow the meat on the bottom to brown, stir with the vegetables and mix together. All all the meat to brown. The liquid from the meat and vegetables will probably cover the meat. Cook over high heat until the liquid is gone. This can take 30-40 minutes depending on the pan. Stir occasionally and as the liquid level drops, lower the heat so the meat doesn't burn.

* Begin heating up the broth.

* When the meat liquid had cooked off, add the red wine. Raise the heat and bring to a boil. Cookuntil the wine has almost completely evaporated, about 5 minutes.

* Clear a space in the bottom of the pan and add the tomato paste. Toast a minute in the hot spot, then stir with the meat and let caramelize for 2 to 3 minutes.

* Stir in the crushed tomatoes, rinse the can with some extra broth. Bring to a boil and cook for 5 minutes.

* Pour in 2 cups of hot broth, stir will and add more if need to cover the meat. Bring to an active simmer, cover the pan and adjust the heat to maintain a slow, steady cooking, with small bubbles breaking the surface.

* From this point, the sauce should cook for 3 hours. Check the pot every 20 minutes and add hot broth as needed to cover the meat. The liquid level should be reducing by 1 1/2 to 2 cups between additions; if it's fall much faster, and it takes more than 2 cups to cover the meat, lower the heat to slow evaporation.

Tuesday, January 04, 2011

Pissaladière

Here's a yummy little snack I pulled together using leftover pizza dough. I'll certainly be making this again!

Pissaladière is a French-style, tart-like form of pizza. This is almost a pissaladière. Hailing from the southern part of France, traditional pissaladière is a flaky style crust with onions, olives and anchovies.

That was my inspiration.

I had a leftover portion of pizza dough (from here.) I stretched it out into a rectangle and brushed with melted butter. I added about 1 TB dried Italian herbs to the butter. Perhaps some French herbs next time. Thyme, Tarragon, Parlsey...Herbs de'Provence.

I caramelized one medium onion, which I spread out over the top of the buttered dough. I would add a second onion next time.

On top of that, I added freshly grated Parmigiana. Being anti-olive and anti-anchovy, those won't be making an appearance.

I baked for about 17 minutes at 450, on a baking sheet. The last few minutes, I removed the pissaladière to the baking stone in the oven to get the crust more crispy.

Slice and serve. I'd show you a picture, but I was too excited to serve this to my guest that evening, that I forgot. This was tasty and I will certainly make this again.

Monday, January 03, 2011

Thank you Nigella

I think this came across my Twitter feed, or maybe a blog RSS, regardless, it was fast, filling and tasty. Oh and there is bacon!

Chicken Schnitzel with Bacon and White Wine

Cook up some bacon, in strips or diced. I find it easier to evenly cook bacon when diced. When cooked, remove to a paper towel lined plate.

Season the chicken cutlets with salt & pepper. Cook in the bacon fat until golden brown, a few minutes per side. Remove the chicken to a plate.

In the pan, add 1 teaspoon of minced garlic, saute for only a few seconds. Quickly add 3/4 cup of dry white wine. Stir and scrape up any bits on the bottom of the pan. Allow to reduce by 1/2. Add one TB of chopped parsley. Stir and add the bacon back into the pan.

Serve chicken with egg noodles and spoon the bacon wine sauce over. A squeeze of lemon is nice to cut the fat.

Chicken Schnitzel with Bacon and White Wine
Adapted from Nigella Lawson

8 slices of bacon, diced
4 chicken cutlets, thinly sliced, seasoned w/salt & pepper
1 garlic clove, minced
3/4 cup of white wine
1 TB chopped parsley

Cook diced bacon in a fry pan over medium-high heat. When done, remove to a paper towel lined plate to drain.

In the bacon fat, cook the chicken, 2-4 minutes per side, until cooked through and golden brown. When done, remove to a plate.

In the remaining fat, add the garlic and cook for just a few seconds. If you cook too long the garlic will burn and get all sorts of nasty. Add the wine, stirring up any bits on the pan. Reduce by half. Add the bacon and parsley to the pan, stir.

Serve chicken with egg noodles or spaetzle, with bacon wine sauce served over the top.

Enjoy.

Sunday, January 02, 2011

Old School, Gourmet Substitute Teacher

I'm a Midwestern boy. Born & raised. A standard supper was Tater Tot Casserole. The only variations I knew of were whether there was corn or beans and whether cheese was on top of the tots or under. But I had a moment of Awesomevation (awesome innovation! thanks How I Met Your Mother & Barney Stinson!). What if I changed several variations. We take the old school and give it a little home-spun gourmet twist.

Southwestern Style Tater Tot Casserole

I started with minced chicken. You can use ground chicken or mince it with the food processor like we did with the Thai Basil Chicken. I went with the minced chicken. Saute for a few minutes until the pink is gone. Remove to a bowl.

In the pan, add 2 TB of butter, saute 1 diced onion. When soft, add some spices. Use a Tex-Mex blend if you have it, or mix cumin, coriander, ground chiles, garlic powder, paprika. All the spices to bloom in the hot, melted butter for a minute. Add 2 diced bell peppers, red & green are good. Plus 1 cup of corn kernels.

Saute the vegetables for 3-5 minutes, until soft. Sprinkle with 2 TB of flour, stir for 2 minutes.

Pour in two cups of chicken broth. Simmer until the broth thickens. Stir the chicken back into the mix. Pour into an 8x8 baking pan.

Top with tater tots and bake for 15-18 minutes. This cooks the tots and allows them to crisp up. Top with shredded cheese and bake for another 3-5 minutes until melted.

Serve hot.

I loved this variation! Can't wait to try it again.

Saturday, January 01, 2011

Happy New Year

Hello all! One of my non-resolution resolutions is to do a better job blogging. 2010 was sad, in terms of blogging. I did plenty of cooking, ate at some great restaurants...but in the end, I just didn't have the blog bug. To start us out, I have simple, awesome, fast snack for you to try.

At a holiday gathering in December, our host put this together for us. It was awesome. I don't know what it is called. I'm calling it...tasty yum yums in tube dough. Really, I don't have a name for them. Ricotta Crescent Roll Ups, how's that? Oh, these things are versatile, can't wait to try other fillings.

Start a tube of refrigerator crescent roll dough. Unroll and do one of two things. Lay the triangles out in a circular shape like this, or just lay them out (photo later). Allow the corners to overlap a little. Place a few leaves of basil or baby spinach on the wide end.

On top of the basil/spinach option, place a tablespoon of seasoned ricotta cheese. I had 8 TB of ricotta, seasoned with salt, pepper and 1 TB of Italian Seasoning. Stir to combine. On a later batch, I seasoned with fresh, chopped basil, salt, pepper and fresh parmigiana. What might you want to try?

On top of the ricotta, add a teaspoon of diced tomato. Use fresh, ripe & fresh tomato, if you have it. Use canned tomato, but drain it first. After the tomato, take the skinny tip of the dough and roll over and tuck under the wide end. You'll have a wreath shape. Bake in a 375 oven for 12-14 minutes, until golden brown. Serve hot.

Here's a simple way to prepare the roll ups if you like.

Stuffed, rolled and ready for the oven.

Baked and ready for serving. Very tasty.


I was thinking of some other options:
Cream cheese & shredded cheddar, broccoli
Queso Fresco, Tex-Mex spices, beans or chicken, roasted peppers or corn
Crumbled feta, oregano, olives
Cream cheese & peanut butter, diced apples and chopped nuts

What do you think?